
POS Settings
Overview
POS settings come in two parts:
- Outlet Registers — configured in the admin dashboard. A register is one till inside an outlet.
- The POS tablet app — a few settings staff can see or change on the tablet itself.
Every POS tablet logs in to one register, and inherits that register's configuration.
Outlet Registers (admin)
In the sidebar open Outlet Registers and create one register per till.
Creating a register
| Field | What it does |
|---|---|
| Name | The register's name (e.g. Front Counter). Required. |
| Outlet | The outlet this till belongs to. Required. |
| Default Order Mode | The mode the POS opens in — Dine in, Take Out, or Delivery. |
| Menu | The menu this register shows. |
| Charge Type | Whether charges (tax, service charge) are applied per Product or per Amount. |
| Shortcut to | The screen the POS opens on — Concierge, Sale, or Order. |
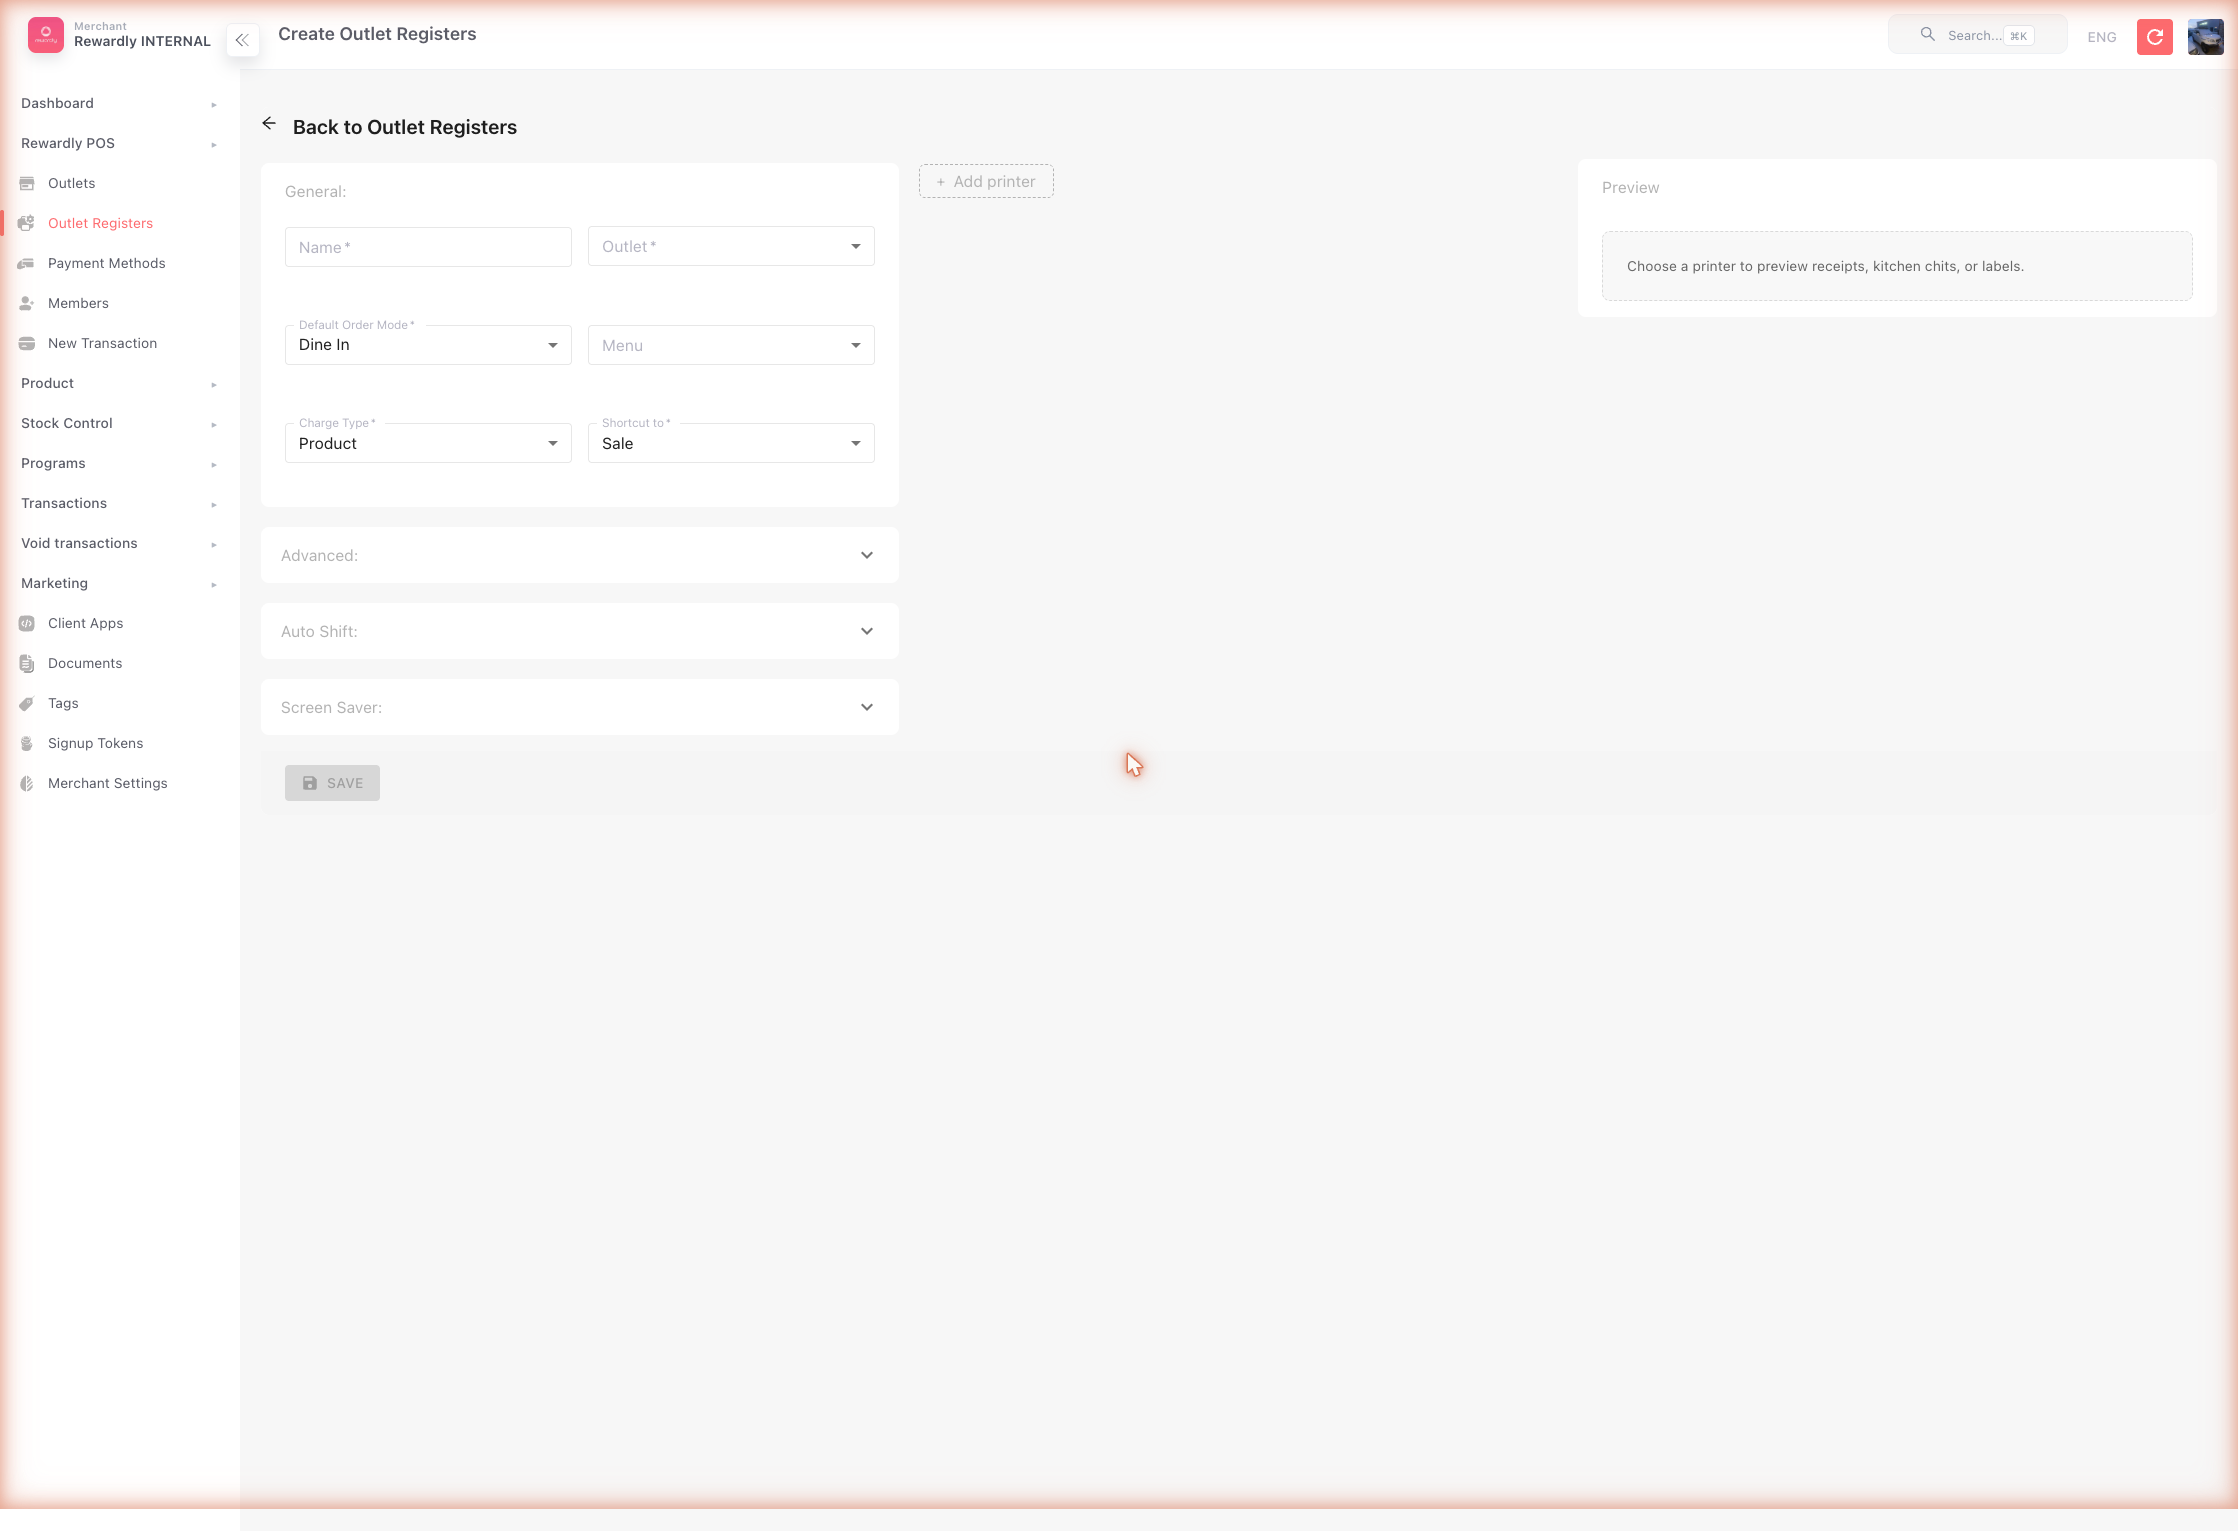
Advanced register options
| Setting | Default | What it does |
|---|---|---|
| Product Num Columns | 5 | How many product columns the POS grid shows (2–6). |
| Menu Product Font Size | 18 | Product name text size. |
| Shift Cash Threshold | 0 | How far the cash counted at shift close may differ from the expected cash; a count outside it is refused. Only checked while Show Expected Cash Total in Till on Shift is off. 0 = must match exactly — see Registers, Shifts & Cash. |
| Show Product Image | Off | Show product images on the sale grid. |
| Show Product Detail Image | On | Show the larger detail image when a product is opened. |
| Print Member on Kitchen | Off | Print the member's name/phone/email on kitchen chits. You can choose which detail (name, phone, or email) and the print size. |
| Route Combo Items to Matching Printers | On | Enable child-level station matching through product tag, category tag, then the default printer. Child routing remains active when Also Print Combo as a Product is on. |
| Print Combo Product Name | Off | Include the combo's own name as a heading on the chit, not as Child (Combo) text. |
| Also Print Combo as a Product | On | Print one further chit for the combo itself, headed --- SUMMARY --- and listing its components, so an assembly station can see the whole dish. It only ever adds a chit — every component still gets its own ticket either way. Turn it off to print only the component tickets. |
| Print Pax Number | Off | Print the table's pax (number of guests) on chits. |
| Allow manual service charge removal | Off | Lets staff remove service charge at the POS. |
| Is Master | Off | Shows web orders on the KDS and enables shift checks for this register. |
| Is Concierge | On | Shows the Concierge tab on the POS. |
| Employee Attendance Tracking | Off | Shows the Attendance tab on this register so staff can clock in/out — see Employee Attendance. |
| Show Expected Cash Total in Till on Shift | On | Shows the expected cash beside the count on the POS close-shift screen, and accepts any count. Turn it off for a blind count checked against Shift Cash Threshold. |
| Show Last Closing Cash on Open Shift | Off | When a shift is opened, shows Cash left at last close — the count from this register's last shift close — beside the cash box, for tills whose cash carries over as the float. Display only — see Registers, Shifts & Cash. |
| PIN Lock After Confirm | Off | Requires a staff PIN after each sale. |
| Preset Delete Reasons | — | A list of reasons staff pick from when voiding items. |
There are also accordions for Auto Shift (enable auto shift management — this hides the shift button on the POS and opens/closes shifts automatically on the per-weekday open/close times you set) and a Screen Saver (background video, YouTube ID, and idle seconds before it appears).
Manual PayNow
Reeward staff only
The Manual PayNow accordion is visible only to Reeward super admins. Merchant operators do not see or edit it.
When enabled, this register accepts Manual PayNow payments matched from incoming payment-notification emails. The accordion holds:
| Field | What it does |
|---|---|
| Enable | Turns Manual PayNow on for this register. |
| Routing key | The key used to route notification emails to this register. |
| Allowed sender emails | The email addresses permitted to send payment notifications. |
| TTS voice / pace / closure greeting | Text-to-speech voice, speaking pace, and closing greeting read aloud when a payment is confirmed. |
Printer settings
Each register can have one or more printers. For every printer you set:
- Name and Targets — which documents this printer handles: Kitchen Chit, Delivery Chit, and/or Receipt. (Some fields are hidden when the target is Kitchen Chit only.)
- Printer type — Sunmi, Epson, TSC, Star, Rongta USB, iMin, iMin v2, Adyen, BLE, ZPL, PAX, NYX, or Other.
- Connection — Local or Sunmi Cloud.
- Sunmi Cloud creds — appId, appKey, serial, and shopId.
- Adyen printer creds — for Adyen printers.
- IP address — the local network address. For Epson printers the IP is read-only — it is synced from the POS device, not typed here.
- Paper Width — 80/58 mm (or 40/50/60 mm for TSC/ZPL label printers).
- Print Density, Font Size, and Header / Footer text.
- Price display format and print merchant / outlet name options.
- Chit begin / end lines — blank lines fed before and after a chit.
- Copy Count — how many copies to print.
- Order Mode Position and a Tags filter (only print products carrying the listed tags).
- Auto Print — print this document automatically for this POS's own orders: receipts when payment is taken, kitchen chits when an order is confirmed. It does not decide whether orders placed online print; Socket Print below does. A kiosk order prints to every printer whose Targets match, whether or not Auto Print is on — a kiosk has no one to tap print, so there is nothing for the setting to gate. To stop a printer receiving kiosk orders, clear its Targets rather than turning Auto Print off.
- Socket Print — print orders that reach this POS over the network, for the channels ticked under Socket Print Channels (Customer, Kiosk, POS, Grab, Foodpanda). Customer is orders customers place on your web or QR menu. This works whatever Auto Print is set to, so a receipt printer with Auto Print off and only Customer ticked prints online orders but not walk-in receipts. In a Full Service outlet, a dine-in pre-order's receipt also needs the outlet's Auto print pre-order receipt setting.
- Multi Language — print in more than one language.
- Product Level — print one physical chit or label per top-level product and quantity.
- Product Bundle Level — print each combo child as its own physical chit or label. Applies only when Route Combo Items to Matching Printers is off; with routing on the components are already separated by station and the combo summary stays whole.
- Print QR Code — include a QR code on the document.
- Print Logo — include a logo, with a logo image and its width.
Combo child routing by printer tag
Use combo child routing when a set meal contains items for different stations.
Example:
- Combo product: Fried rice set
- Combo child products: Egg fried rice and Drink
- Category tag: drink, assigned to the Drinks category containing the child
- Kitchen printer: Rongta USB, target Kitchen Chit, tag filter drink
Set the outlet register options like this:
| Setting | Value |
|---|---|
| Route Combo Items to Matching Printers | On |
| Also Print Combo as a Product | Off |
| Print Combo Product Name | Optional; turn on if the drink chit should show Fried rice set above the drink line. |
Expected result:
- The receipt printer prints the customer receipt.
- The tagged kitchen printer prints a kitchen chit for Drink.
- Egg fried rice does not print on the drink printer.
- The combo parent is a heading only; it is not a separately routed product.
With Also Print Combo as a Product off, routing follows this order:
- A direct product tag that matches any configured tagged printer wins.
- Category tags are used only when no direct product tag matches a configured printer.
- If neither matches, the item goes to the default kitchen printer with no tags.
Two printers that share the same matching tag both receive the item. Children from the same combo line print under one combo heading; two separate lines of the same combo each keep their own heading.
Keep one kitchen printer with no tag
Step 3 needs a kitchen printer that carries no tag. If every kitchen printer is tagged, an item matching none of those tags reaches no printer at all and prints nowhere — silently, with nothing on the order to say it was dropped. This applies on the POS and the kiosk alike. Leave one untagged kitchen printer as the catch-all, even if it rarely prints.
Preview before you save
A live Printer Preview pane (it stays pinned as you scroll) renders a sample receipt, kitchen chit, or label for the printer you are editing. Use the receipt-type picker to switch between previews and confirm the layout before saving.
On the POS tablet
Open Settings inside the POS tablet app. It has two groups.
Staff tools
Navigation shortcuts for the cashier: Notifications, Edit Profile, Change Password, Invite Customer, Shift Report, Check for Updates, Printer Settings, and Help.
Program settings (view only)
The Loyalty, Membership, Store credit, Outlet Settings, and Other panels are read-only on the tablet — they simply mirror what you configured in the admin dashboard, so staff can check the rules without changing them.
Outlet Register (editable on the tablet)
The Outlet Register panel is the one place staff can change settings on the tablet:
| Setting | What it does |
|---|---|
| Default order mode | Switch between Dine in and Takeout. |
| Product Name Font Size | Adjust product text size (12–28). |
| Product Number of Columns | Adjust the grid columns (2–6). |
| PayNow QR on second display | (Android) Show the PayNow QR on a second screen. |
Font size and column changes are saved with a Save Changes button.
Related
- Outlet Settings — the branch each register belongs to.
- Payment Methods — what the POS can accept as payment.
- At the Counter — how a sale works on the POS.