
Merchant Settings
Overview
Merchant Settings are your platform-wide settings — they apply across your whole business: every outlet, every till, the member app, and the POS. To open them, click your merchant name in the band at the very top of the sidebar.
The screen is organised into tabs. This page covers them all, but for a first setup you only need the Programs tab.
Don't confuse it with the sidebar entry of the same name
There's also a Merchant Settings entry further down the sidebar. That's a different screen — it holds only policy and preference text, not the tabs described on this page.
Start with the essentials
To get a loyalty program running you only need the settings in The essentials below. Everything else can wait until you need it.
The essentials
Open the Programs tab and set these. They define how your points work:
| Setting | What it means | Bean & Brew example |
|---|---|---|
| Loyalty unit name | What you call your points | Beans |
| Loyalty unit type | Whether points act like a count or like currency | Points |
| Point → Currency value | The cash value of one point | 1 point = $0.01 |
| Upgrade membership automatically | Members rise through tiers on their own | On |
| Allow member to skip level | Members can jump past a tier when they qualify | On |
| Redeem loyalty point at POS | Points can be used as payment at the till | On |
| Disable Store Credit | Master switch that turns store credit off | Off (keep it on) |
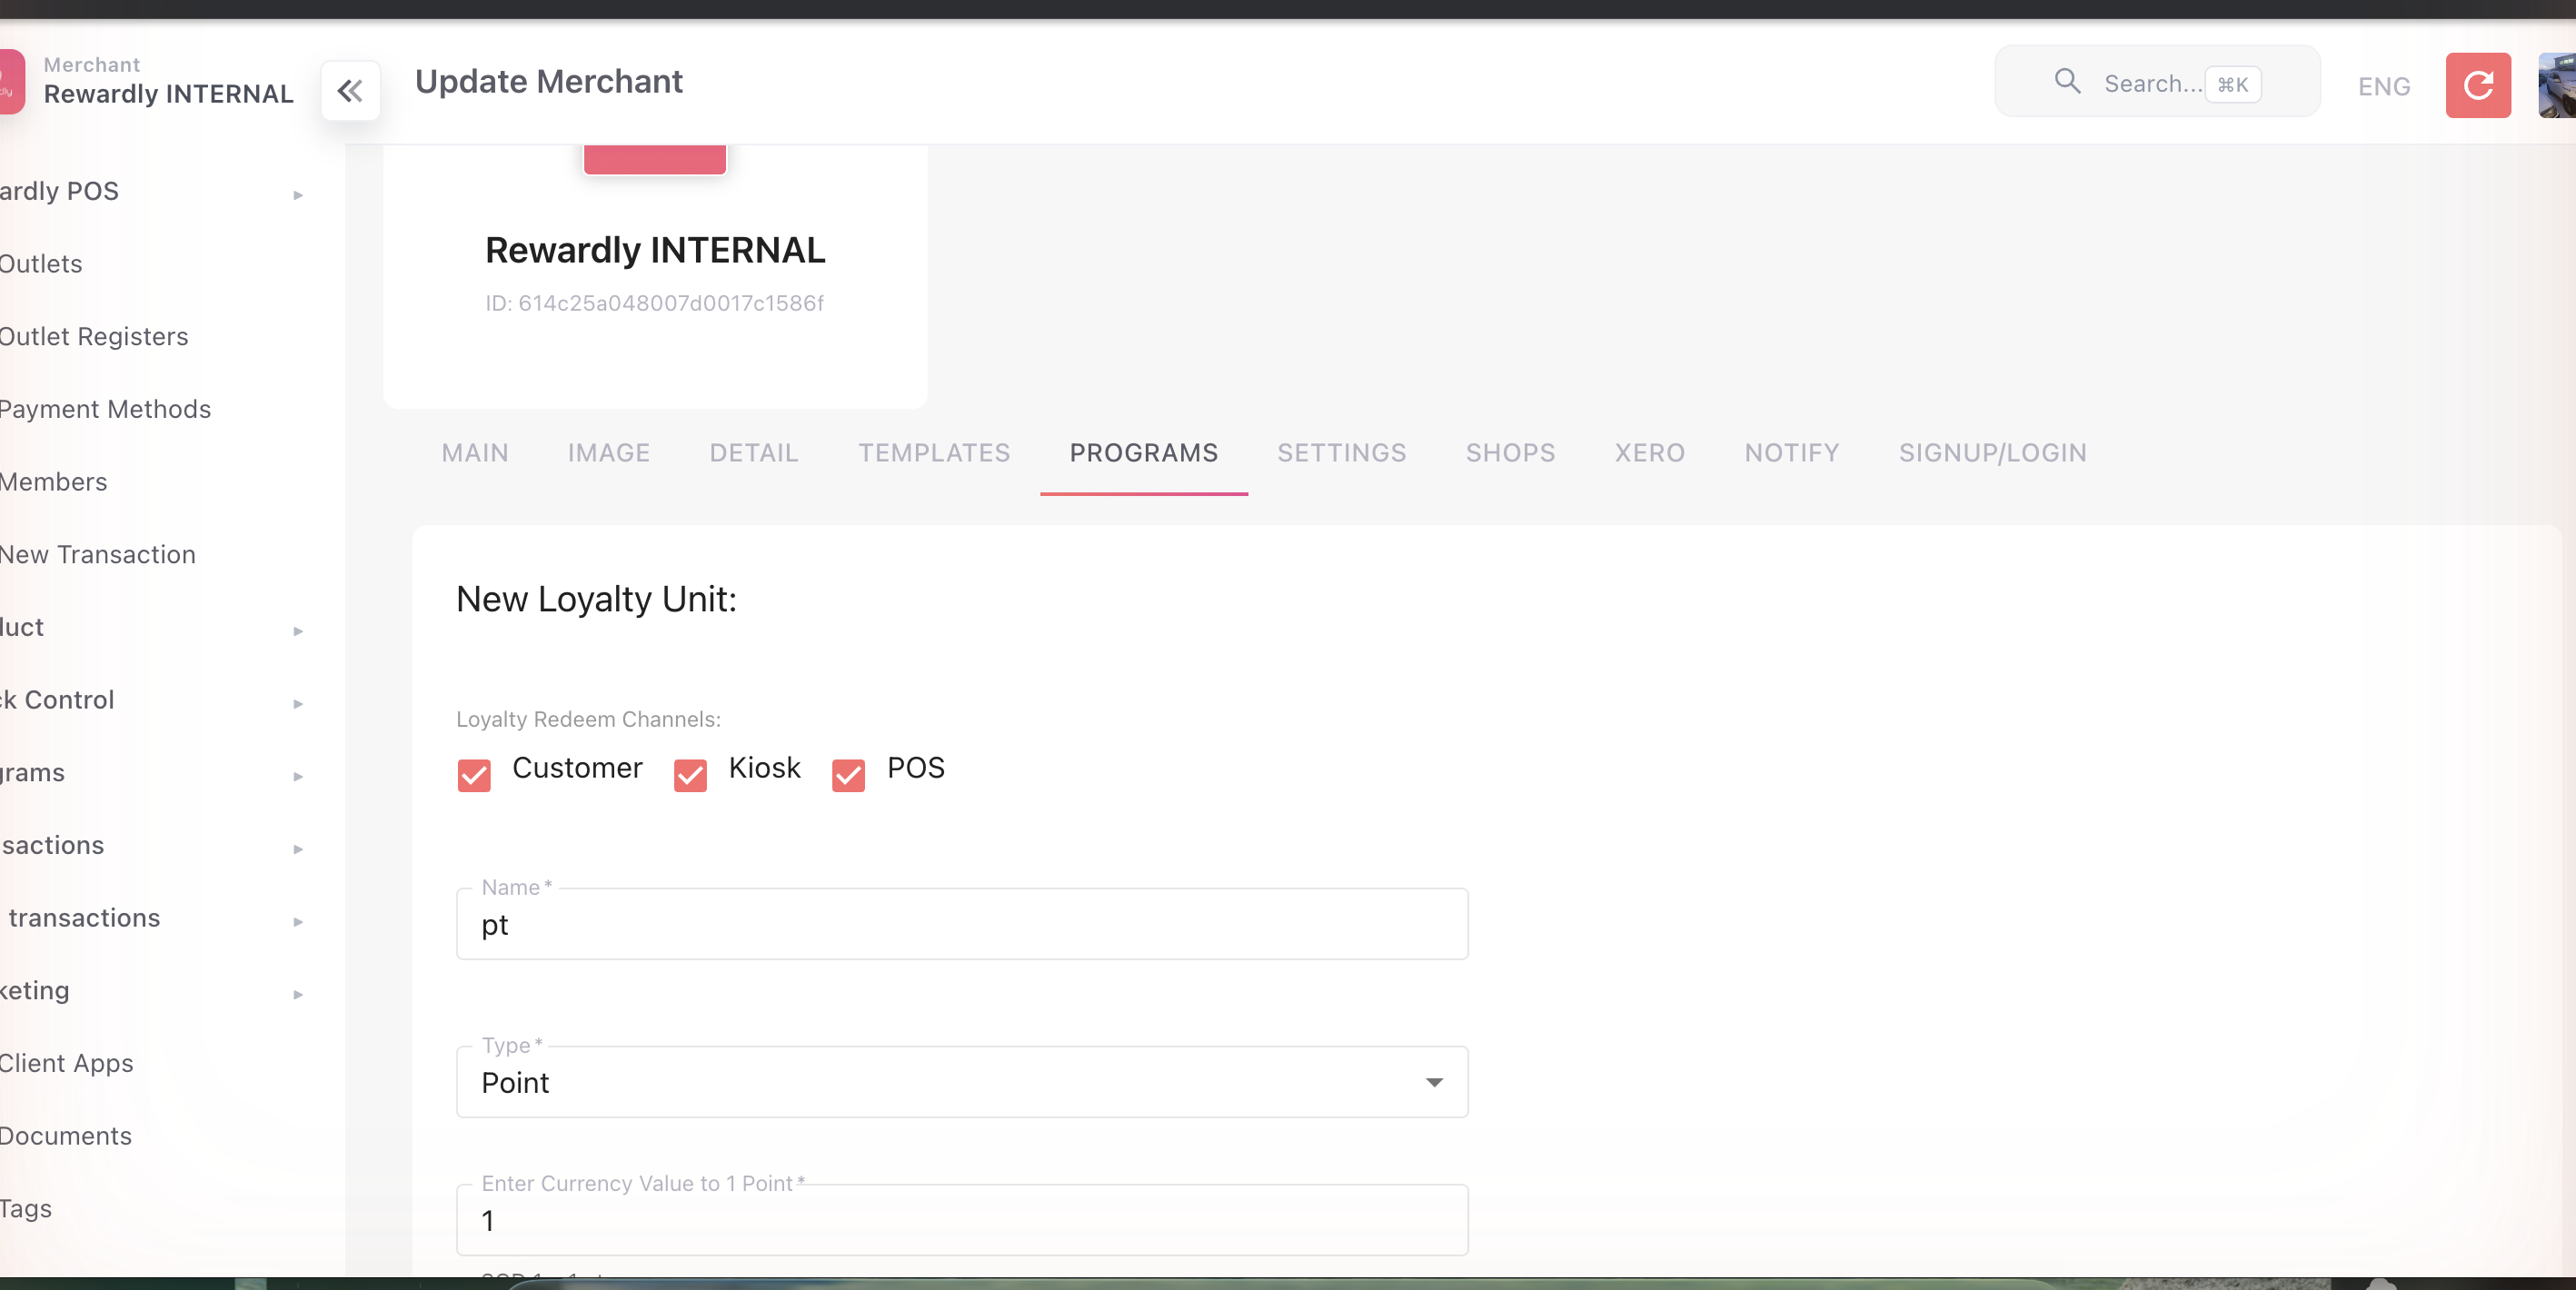
Programs tab — full reference
Loyalty
| Setting | What it does |
|---|---|
| Loyalty Redeem Channels | Where points can be redeemed — Customer, Kiosk, POS. |
| Loyalty unit name | The name of your points (e.g. Beans, Points, Stars). |
| Loyalty unit type | How the unit behaves. |
| Point → Currency value | What one point is worth in money. |
| Membership min active days | The minimum time a member must hold a tier before they can drop from it. |
| Point validity (days) | A platform-wide expiry for earned points. |
| Birthday Month Point Bonus | A point multiplier during a member's birth month. |
| Date Range Point Bonus | Point multipliers for set promotional date ranges. |
| Bonus Point On Completing Profile | A one-time point award when a member completes their profile. |
| Profile Fields | Which profile fields count toward that completion bonus. |
Membership
| Setting | What it does |
|---|---|
| Upgrade membership automatically | Members are auto-promoted when they qualify. |
| Allow member to skip level | Members can jump straight to a higher tier. |
| Redeem loyalty point at POS | Points can be used as a payment method at the till. |
| Redeem loyalty point at Shopify, or QR | Members can redeem points themselves — through the QR code in the member app, or in your linked Shopify store. |
| Include service charge for point calc | Service charge counts toward points earned. |
| Is closed promotion | Closes the program to general sign-up so members are added by invitation only. |
| Loyalty is decimal | Points can have decimal values rather than whole numbers. |
| Allow referral | Enables referral programs. |
| Allow birth-month voucher | Issues a voucher during a member's birth month. |
| Birthday auto-send email / SMS | Automatically messages members on their birthday. |
| Receipt claim expire days | How long a receipt stays claimable for points after the sale. Defaults to 30 days. |
Tiers can override two of these
A membership tier can override Upgrade automatically and Allow skip level with its own settings. The values here are the defaults.
Store Credit
| Setting | What it does |
|---|---|
| Disable Store Credit | The master switch — on means store credit is off everywhere. |
| Store Credit Redeem channels | Where store credit can be spent. |
| Store value validity (days) | A default expiry for issued store credit. |
| Unlock store credit | Requires a member to reach a set balance before credit becomes spendable. |
| Allow negative store credit | Lets a balance fall below zero (used with post-pay credit). |
| Negative store credit rules | Limits, billing cycle, and SMS/email reminders for negative balances. |
Default Credit Allocation
A merchant-wide default for post-pay credit — the credit-limit allocation that's applied to members by default when you run a post-pay (charge-now, pay-later) program. Set it here once and it underpins the whole post-pay credit flow rather than configuring a limit on every member by hand.
Where post-pay credit is set up
This default is one piece of the larger feature. For the credit account model, billing cycles, and statements, see Post-pay Credit.
Voucher Event
A toggle plus an events array used to drive voucher events — the rules that issue vouchers when a configured event fires. This control only appears when you're editing an existing merchant, not while creating one.
Other tabs
The Programs tab covers your loyalty rules. The remaining tabs hold the rest of your merchant profile. The Main tab — business name, subdomain, currency (SGD, HKD, MYR, USD, AUD, THB, IDR, VND, CNY, JPY), go-live date, and registration toggles (allow register, SMS login, terms-on-login, gift vouchers) — is described in The essentials territory above; here's what each of the others does.
Main
Beyond the business name, subdomain, currency, and the registration toggles already covered above, the Main tab holds these merchant-wide options:
| Setting | What it does |
|---|---|
| Signup Token Required | Requires a valid signup token before a customer can register — use it to gate sign-up to invited members only. |
| Claim Voucher Verification | Requires verification when a member claims a voucher. Defaults to on. |
| Allow Gift Vouchers | Lets members buy and send gift vouchers. Defaults to on. |
| Order Payment Locked | Locks paid orders so they can't be deleted. The matching per-order flag is respected on the order screen. |
| Is Sponsored | Marks the merchant as sponsored. |
| Is FAQ Local | Serves the merchant's FAQ content locally. |
| Partner Code | A partner reference code for the merchant. |
| merchant Code | The merchant's filter code. It's locked once set — you can't change it after creation. |
| Wallet Pass enabled | Turns on Apple / Google wallet passes for members. Pair it with Use Merchant Template to render passes from your own template. |
| Feedback enabled | Collects post-order feedback. Set send feedback after order (in minutes) to control how long after an order the request goes out. |
MDR Configuration (superAdmin only)
The MDR Configuration array — rows of from-date, to-date, and MDR rate % — records the merchant-discount-rate used for accounting. It's editable by Rewardly staff (superAdmin) only.
Some fields are read-only for you
Subdomain, Go-Live Date, and Is Active can only be changed by Rewardly staff (superAdmin). They appear on the Main tab but are read-only for merchant admins.
Image
Your brand artwork — image, logo, up to ten covers, and a 3:1 banner. These appear in the member app and on shareable links.
Detail
Your public contact and policy details:
| Field | What it does |
|---|---|
| Contacts | First/last name, two phone numbers, email, web, and social handles (Facebook, Instagram, Twitter). |
| Working hours | Open/close times per day, Mon–Sun (e.g. 09:00-18:00). |
| Terms & Conditions | The rich-text body shown to members — surfaced at login when Require Terms & Conditions on Login is on. |
| Disqualify Words | Words that block a name or entry from qualifying. |
Template
Controls the layout of your transactional email and notification templates — the look of the messages Rewardly sends members. Edit it only when you want to restyle those emails.
Settings
Bring your own transactional email and SMS providers, plus outbound webhooks:
| Setting | What it does |
|---|---|
| Use Custom SMTP | Send email through your own server — host, port, secure, auth user, and pass. |
| Use Custom SMS | Send SMS through your own gateway — apiToken, from, and servicePlanId. Provider type is fixed to sinch. |
| Webhook | A Webhook URL plus a LoyaltyOS URL for outbound event posts. |
| Voucher Sync | An endpoint Rewardly calls to sync vouchers. |
These power your custom messages
The SMTP and SMS providers here drive the custom transactional email and SMS that Marketing sends. The SMTP and SMS sections only appear when you're editing an existing merchant, not creating one.
Shops
Link your other commerce platforms:
| Platform | What it does |
|---|---|
| Shopify | Enter your API Key, API Secret, and Shop, then Link Shopify. Once linked, the store details show with an Unlink button. |
| Vend | Link your Vend account; the linked display shows the store name and an Unlink button. |
| Revel | Enter the Revel instance, key, secret, and signature secret. |
Products pulled in from Shopify show a source of shopify and can be filtered by that source in the product list.
Xero
Maps your sales, tax, service charge, rounding, and payment buckets to Xero ledger accounts for accounting export. This is a merchantAdmin-only tab and needs a Xero connection first — see Xero Integration for the full walkthrough.
Notify
A grid of Email / SMS toggles per event type — Voucher, Membership, Loyalty Point, Store Credit, and Stamp — deciding which loyalty events message your members.
Signup / Login
Controls what your member app and POS ask new customers for:
| Setting | What it does |
|---|---|
| Per-field config | For each field (phone, email, password, first/last name, birthday, gender), set Is Show and Is Required. |
| Preferred Login Type | How members sign in — Phone, Email, Phone OTP, or Email OTP. |
| Guest Login Type | Whether guest checkout needs phone/email (required, optional, or none). |
| Preferred Email Domains | A list of accepted domains (e.g. gmail.com). |
| Show Google Login | Whether the Sign in with Google icon appears on your member app login screen. On by default; turn it off to hide Google sign-in for your members. |
Google is the only social sign-in you can control here. Facebook sign-in isn't offered as a setting — it stays off for your members and can't be switched on from the admin.
This shapes the sign-up screen
These settings drive the fields and login method your customers see when they join — in both the member app and at the POS. See Getting Started.
Client Apps
Client Apps is a separate developer screen for API integrations, reached from Client Apps (/applications) in the sidebar (not a tab within Merchant Settings). It lets you register OAuth-style API credentials so a third-party or headless system can authenticate against the Reeward API on your behalf — for example a custom storefront, a back-office tool, or an external service that needs to read or push data programmatically.
The list shows three columns:
| Column | What it is |
|---|---|
| Name | The label you gave the app, so you can tell your integrations apart. |
| Client | The Client ID — the public identifier for the app. |
| Client Secret | The private key the app uses to authenticate. |
To register one, click Create Client App and enter a Name — that's the only field you provide. Rewardly generates the Client ID and Client Secret for you. Open the app again (edit it) to view both credentials; they're read-only here, so you copy them out rather than type them in.
Keep the Client Secret confidential
The Client Secret is a password for your account's API access. Store it somewhere secure, never commit it to a public repository or share it in plain text, and treat anyone who holds it as able to act against your data through the API.
Related
- Loyalty Points — uses the loyalty unit and multipliers set here.
- Membership & Tiers — uses the auto-upgrade and skip-level defaults.
- Store Credit — controlled by the store-credit master switch here.
- Post-pay Credit — uses the Default Credit Allocation and negative-store-credit settings here.
- Outlet Settings — per-branch settings that sit below these.
- Marketing & Messaging — uses the custom SMTP/SMS providers set on the Settings tab.
- Customer App — Getting Started — shaped by the Signup / Login fields here.