First-Time Setup
This guide takes you from a brand-new account to a working loyalty program and a test sale — in about 30–45 minutes. Follow the steps in order: a few of them depend on earlier ones.
Read this first
If you haven't yet, skim Core Concepts — especially "Membership and Loyalty are a pair." It explains why Step 5 must come before Step 6.
We'll set up our running example, the Bean & Brew coffee shop. Swap in your own business details as you go.
What you'll do
| Step | What | Where |
|---|---|---|
| 1 | Create your account | Sign-up page |
| 2 | Set your loyalty basics | Merchant Settings |
| 3 | Create your first outlet | Outlets |
| 4 | Add a few products | Products |
| 5 | Create a Membership tier | Loyalty & Programs |
| 6 | Create a Loyalty program | Loyalty & Programs |
| 7 | Connect a POS register | Outlet Registers + tablet |
| 8 | Run a test sale | POS tablet |
| 9 | Go live | Checklist |
Step 1 — Create your account
Open the Rewardly admin sign-up page and complete the four-step form:
- Register your information — email, phone number, name, and a password.
- Verify your phone — enter the 4-digit code sent by SMS.
- Verify your email — enter the 4-digit code sent by email.
- Register your merchant — your business details:
- Merchant name — e.g.
Bean & Brew - Merchant URL — your subdomain, e.g.
beanandbrew - Business type and Category
- Loyalty name — what you call your points, e.g.
Beans - Loyalty type and Point conversion — how spending becomes points
- A few starter toggles (you can change all of these later in Step 2)
- Merchant name — e.g.
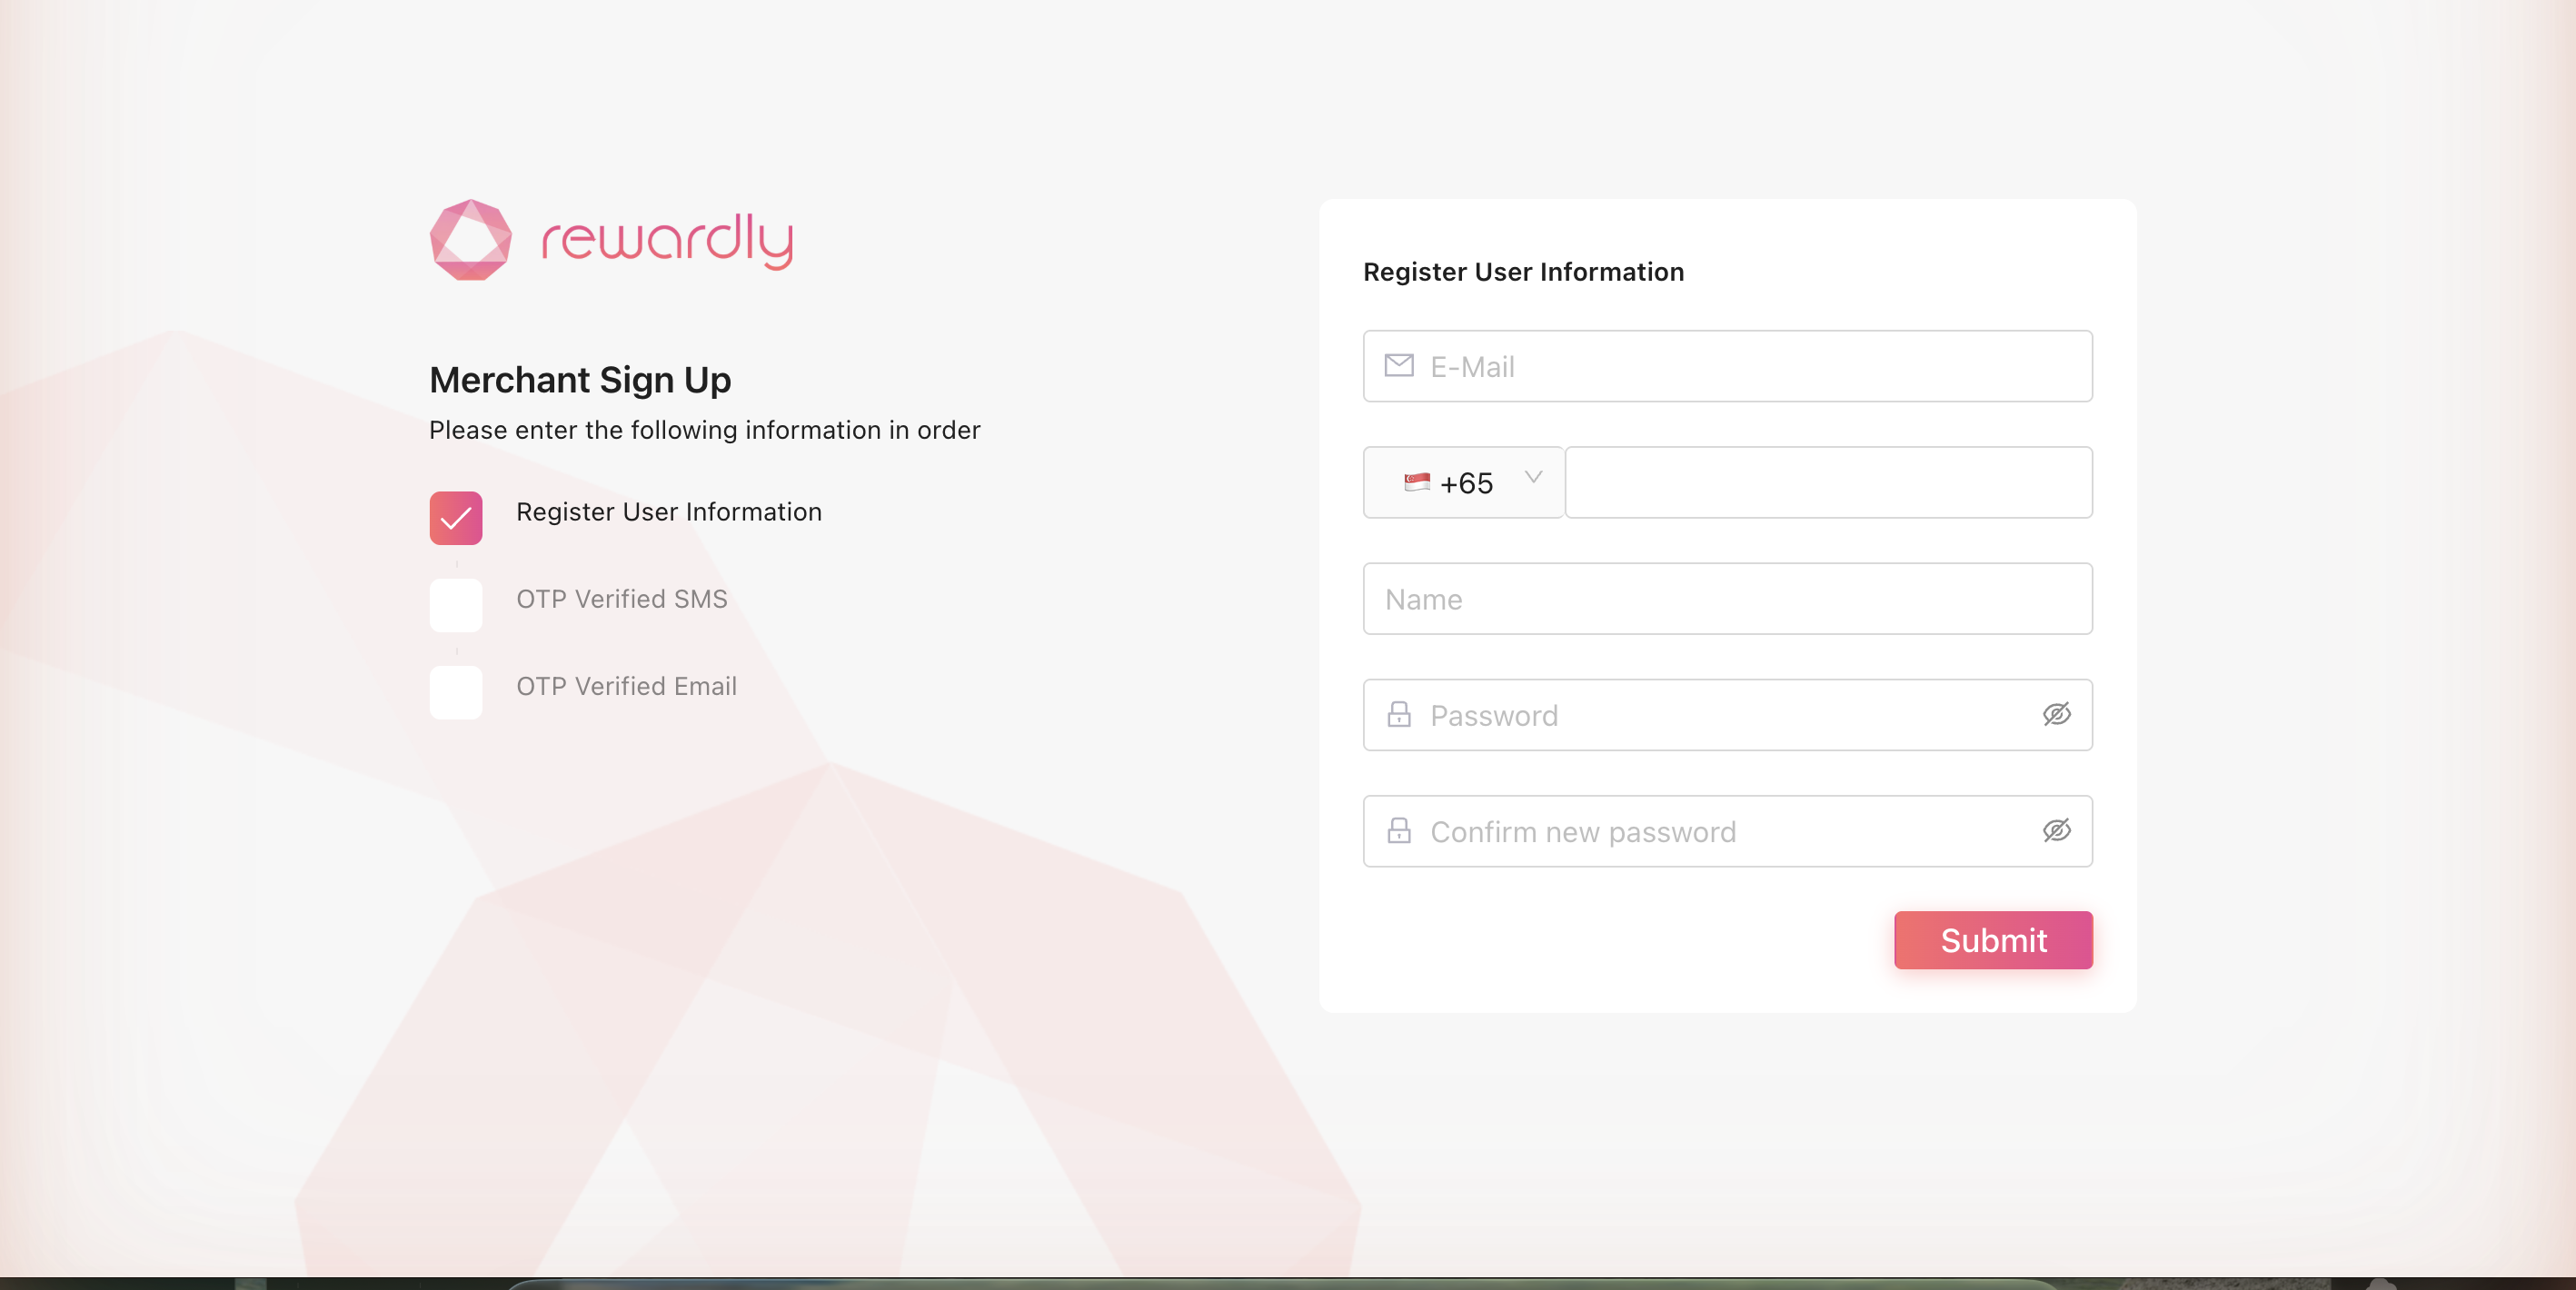
When you finish, you land in the admin dashboard. This is your control centre for everything that follows.
Step 2 — Set your loyalty basics
Open Merchant Settings from the sidebar, then the Programs tab. This is where your platform-wide loyalty rules live. For a first setup, set just these:
| Setting | What it means | Bean & Brew example |
|---|---|---|
| Loyalty unit name | What you call your points | Beans |
| Loyalty unit type | Whether points behave like a count or like currency | Points |
| Point → Currency value | What 1 point is worth when redeemed | 1 point = $0.01 |
| Upgrade membership automatically | Members move up tiers on their own when they qualify | On |
| Allow member to skip level | Members can jump past a tier if they qualify | On |
| Allow redeem loyalty | Points can be used as payment | On |
| Disable Store Credit | Turns the store-credit wallet off | Off (keep store credit on) |
Leave everything else at its default for now — the Merchant Settings page explains every field when you're ready.
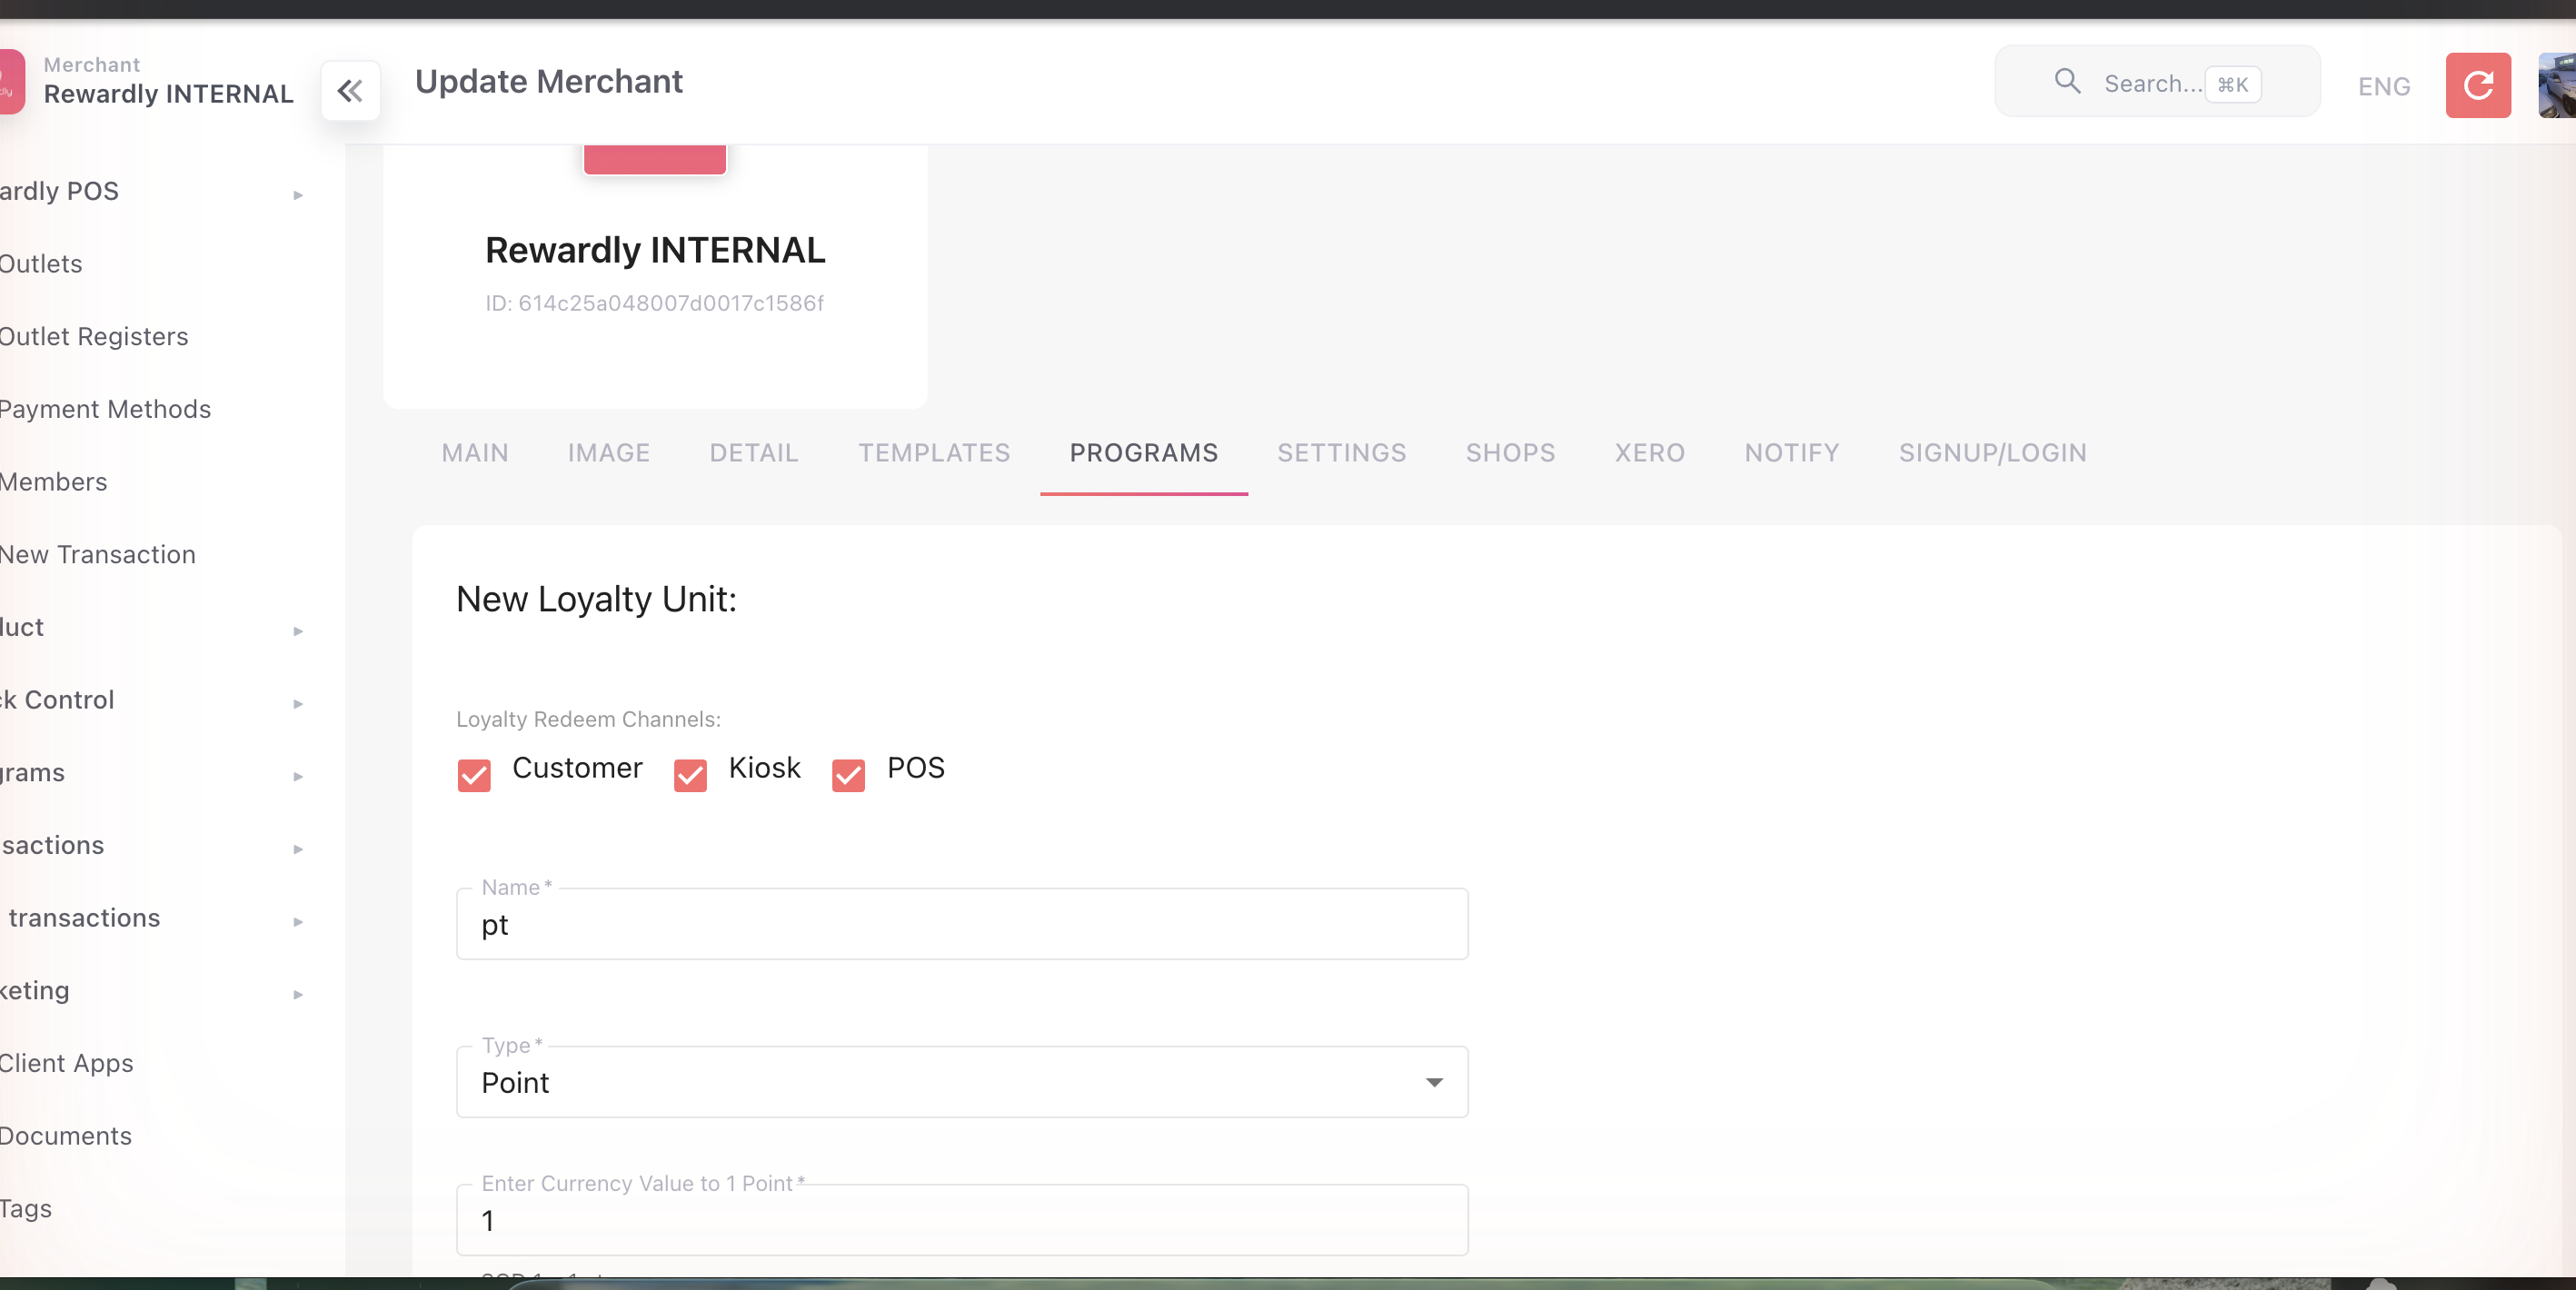
You can change these any time
These are platform-wide defaults. Individual membership tiers can override the two membership toggles — see Membership & Tiers.
Step 3 — Create your first outlet
An outlet is one physical location. You need at least one.
- In the sidebar open Outlets, then click Create.
- On the Main tab: enter the Name (
Bean & Brew — Main) and leave Is Active on. - On the Details tab: fill in the address, contact details, and working hours (format
HH:mm-HH:mm, e.g.09:00-22:00), and set the location on the map. - If you sell food/drink and take orders, open the Order tab and set your tax rate and service charge — otherwise skip it for now.
- Save.
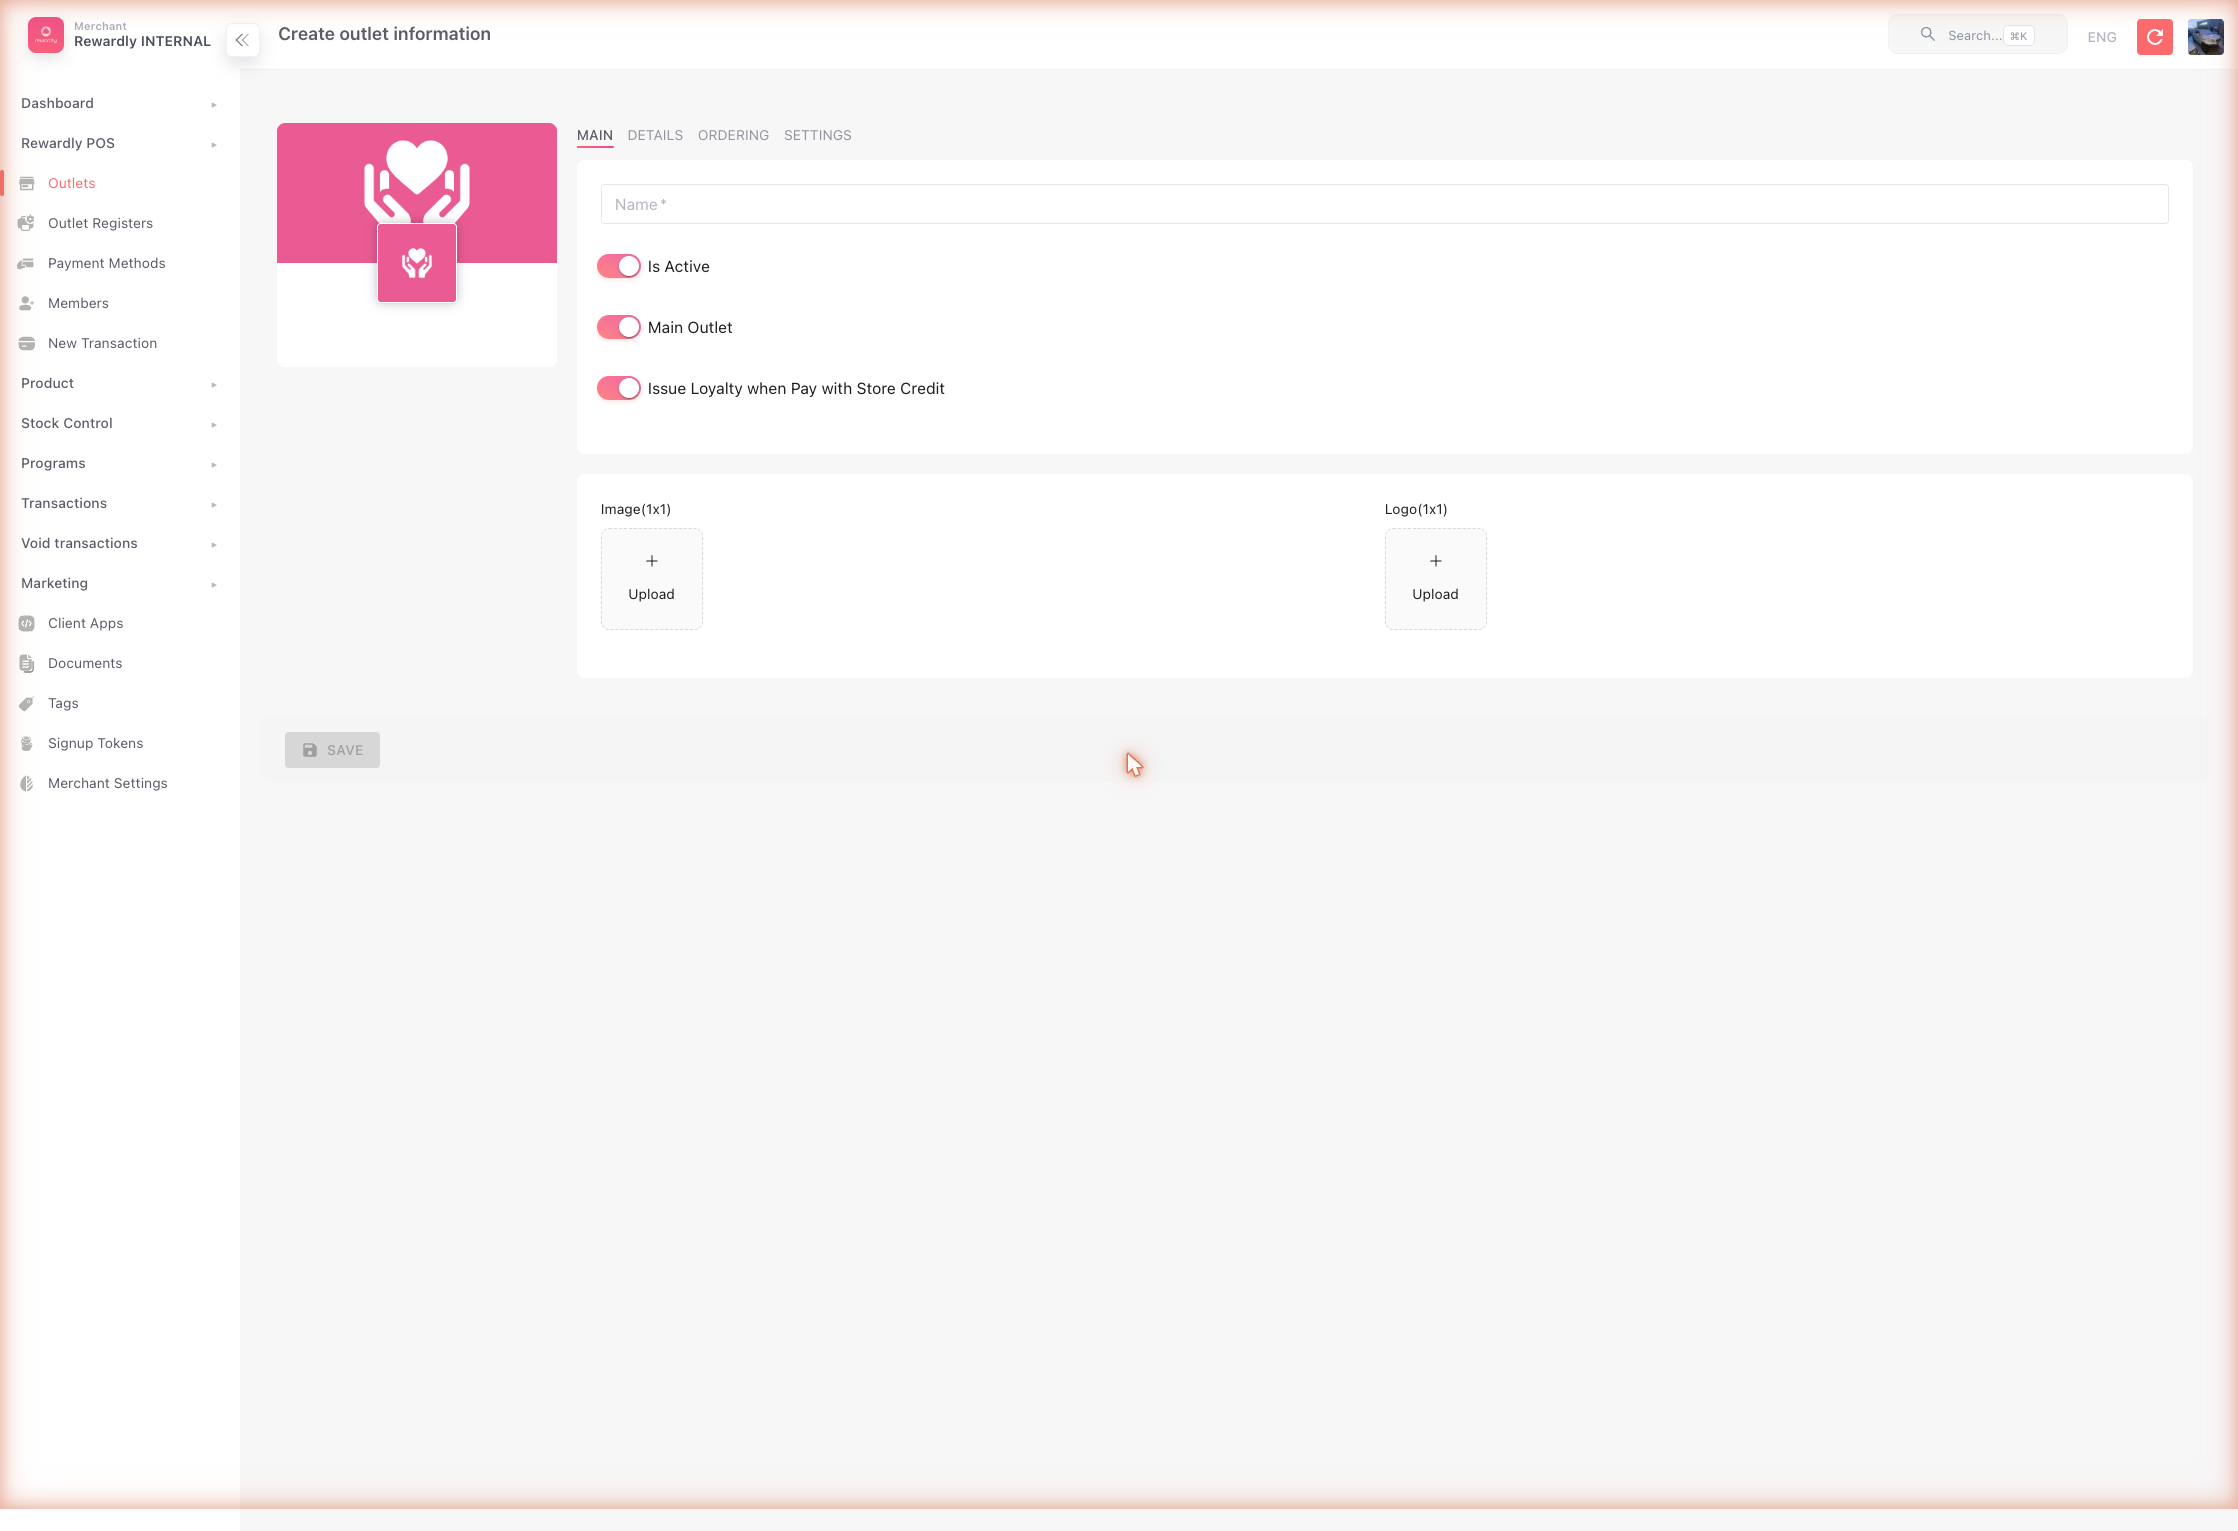 The full list of outlet options is on the Outlet Settings page.
Step 4 — Add a few products
You need something to sell before you can test a sale.
- (Optional but recommended) Open Products → Product Categories and create a category, e.g.
Coffee. - Open Products → Products and click Create.
- Fill in the basics: image, name (
Latte), category (Coffee), a product code, and the price. - Leave Loyalty Ratio on Default Ratio so the product earns points at your normal rate.
- Save, and repeat for two or three products.
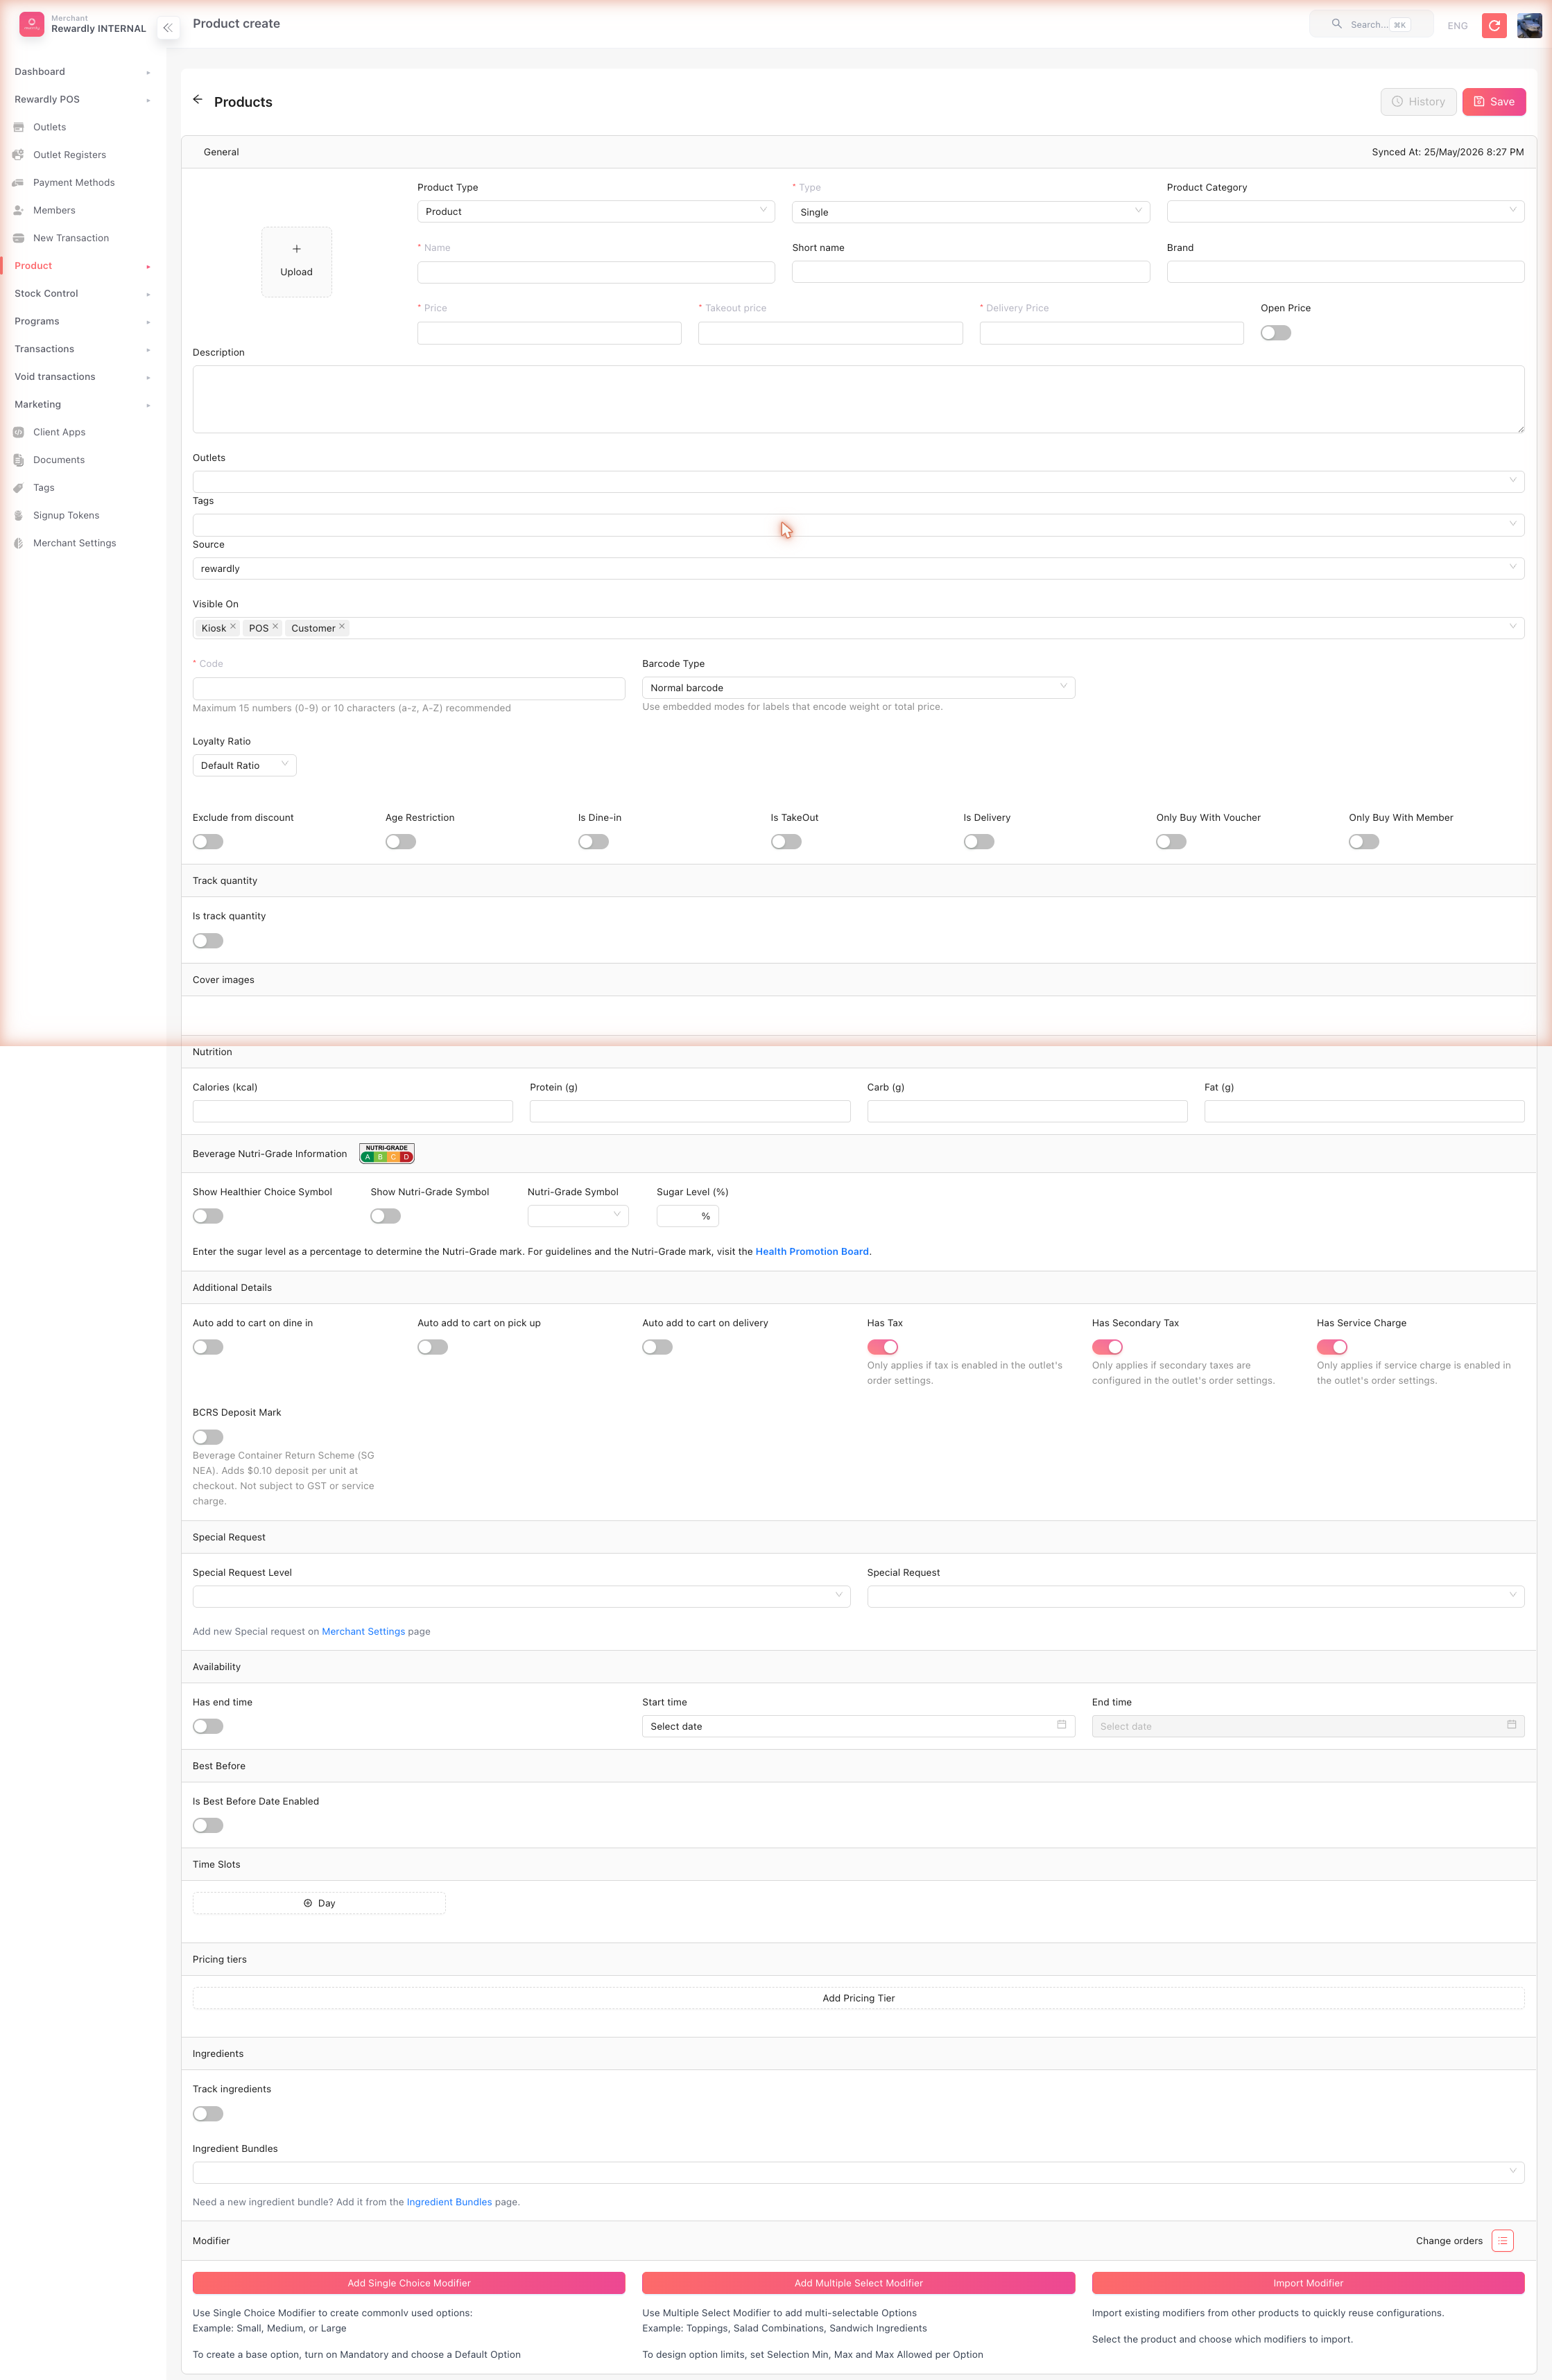 See the Products & Categories page for variants, modifiers, and combos.
Step 5 — Create a Membership tier
Do this step before Step 6
A Loyalty program cannot be saved without a membership tier to attach it to. Create the tier first.
- In the sidebar open Loyalty & Programs → Memberships, then click Create.
- Enter:
- Name —
Member - Level —
1 - Is Active — on
- Show on Member App — on
- Name —
- Leave everything else at its default. (Validity, colour, birthday points, and the override toggles are all optional — see Membership & Tiers.)
- Save.
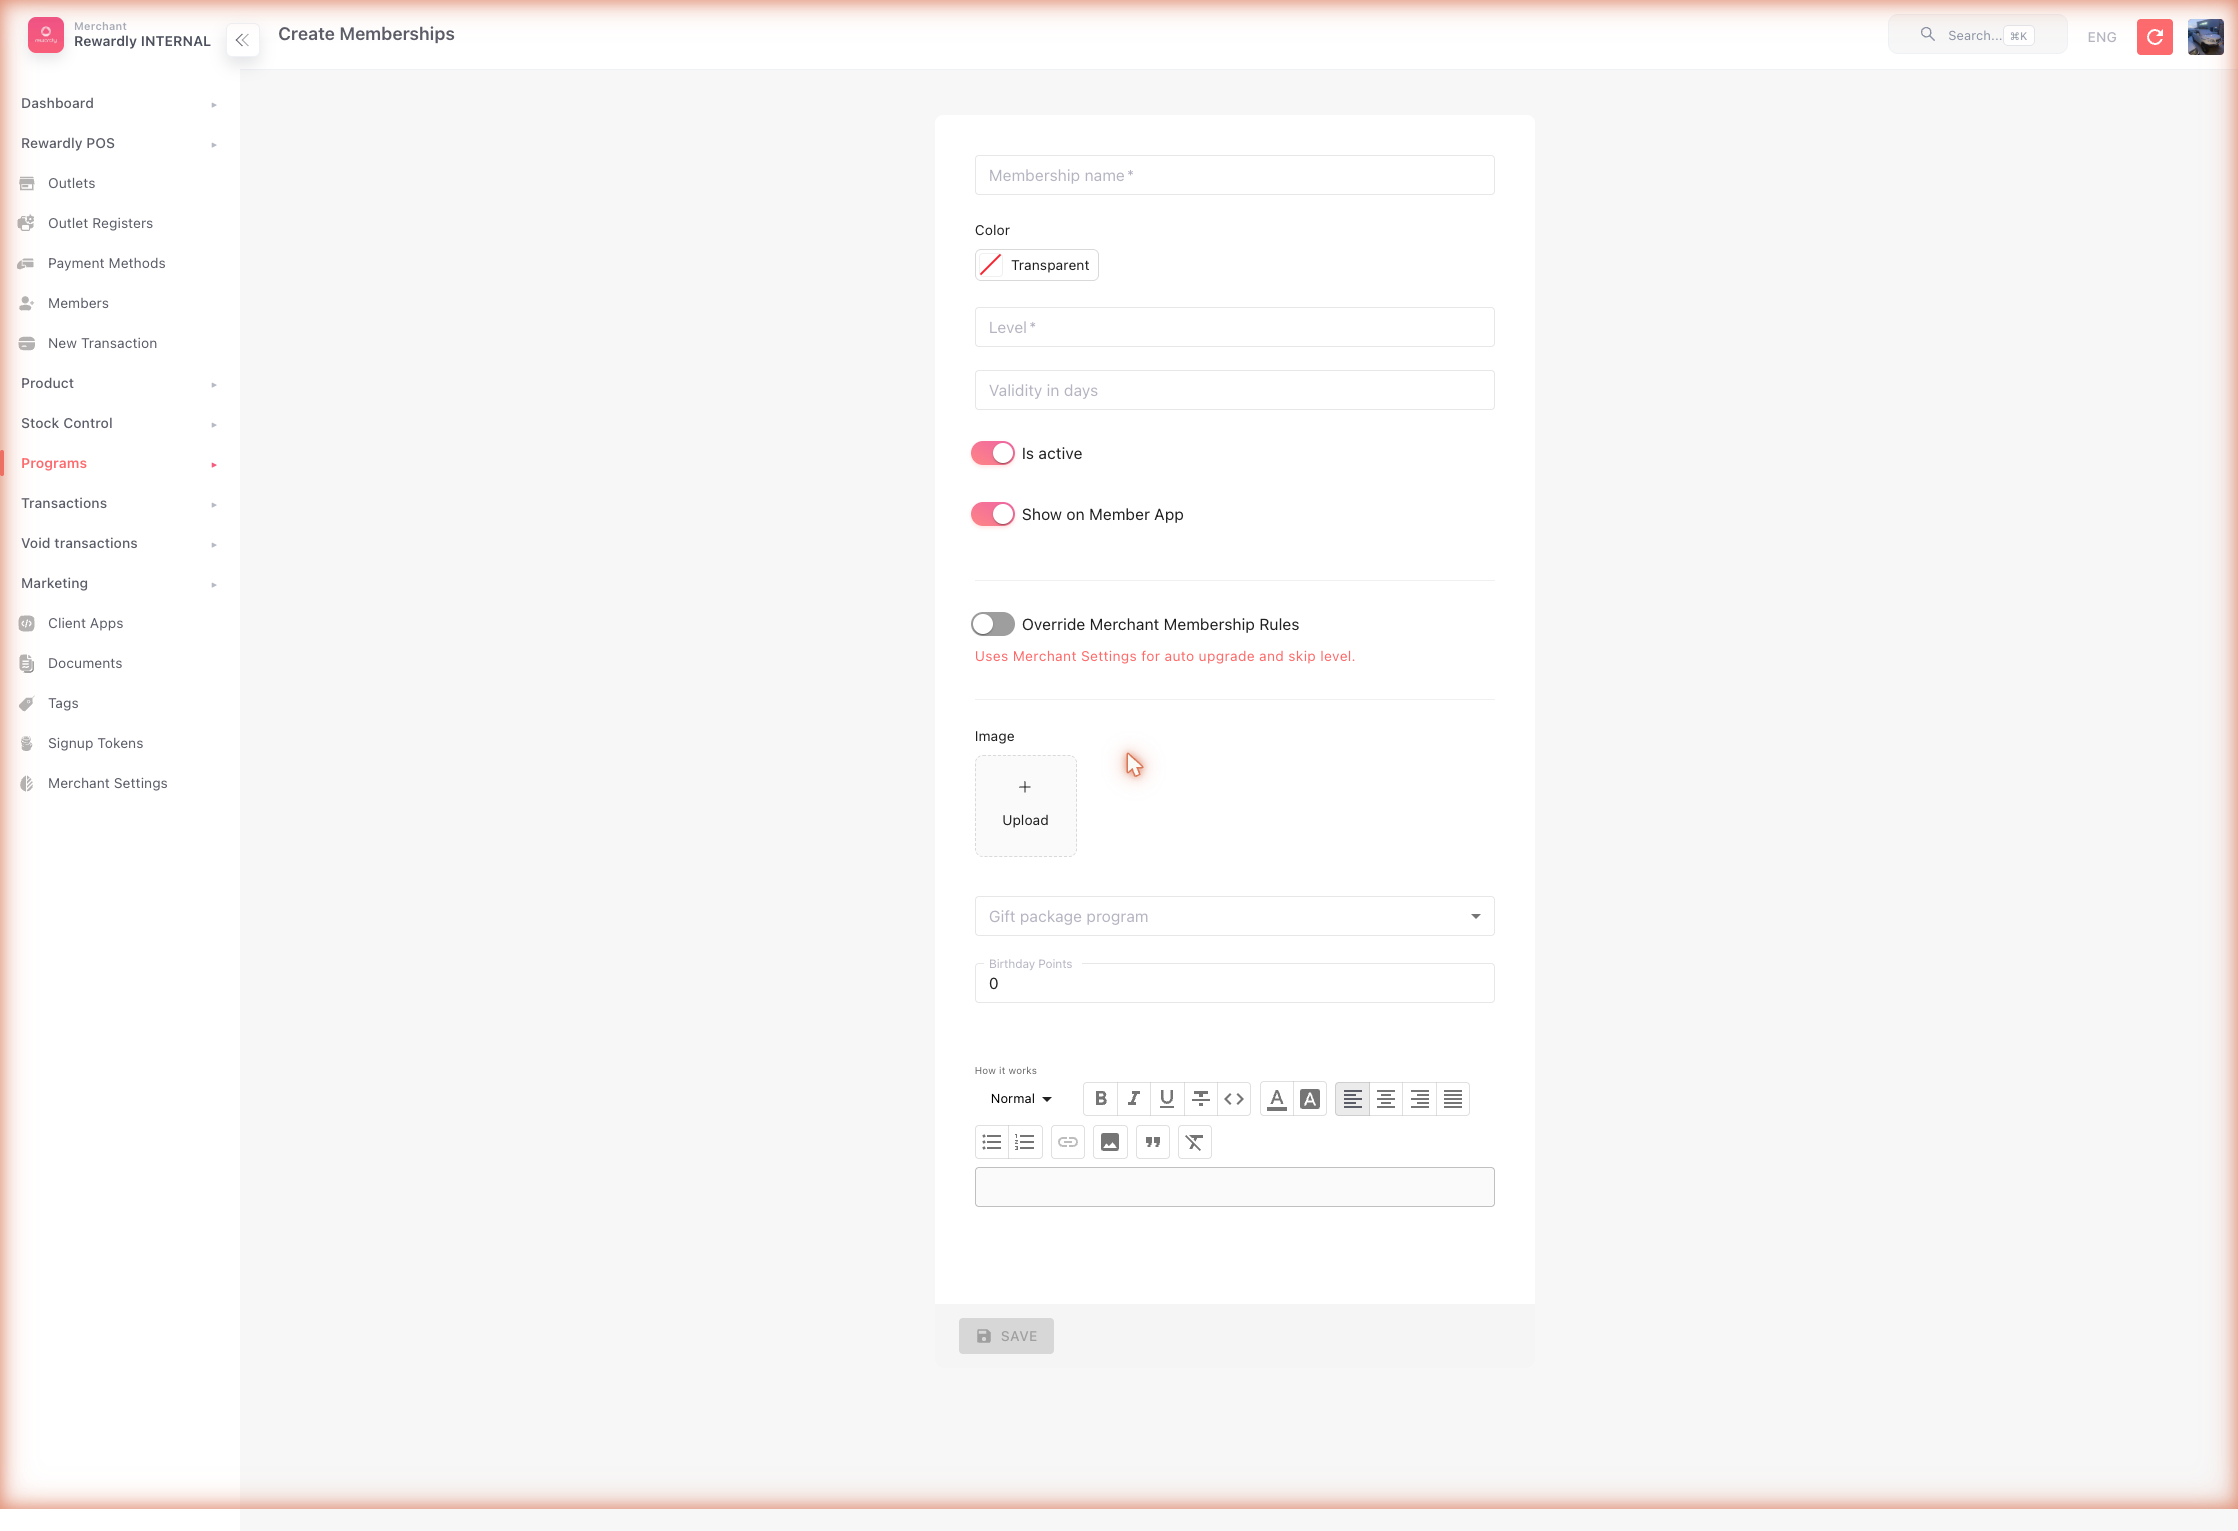 You now have one tier called Member. Every customer who joins Bean & Brew will start here.
Step 6 — Create a Loyalty program
This is the program that actually earns points for members.
- In the sidebar open Loyalty & Programs → Loyalty Programs, then click Create.
- Enter:
- Name —
Beans Rewards - Membership — choose
Member(this field is required — it's the tier you made in Step 5) - Ratio — this sets the earn rate. With a ratio of
1, a customer earns 1 Bean per $1 spent. (The form shows it as1 = 1 Bean.) - Portion Count —
1 - Portion Interval Days —
0
- Name —
- Leave Outlets empty so it applies at every outlet.
- Set Status to Draft while you check everything.
- When you're happy, change Status to Live and Save again.
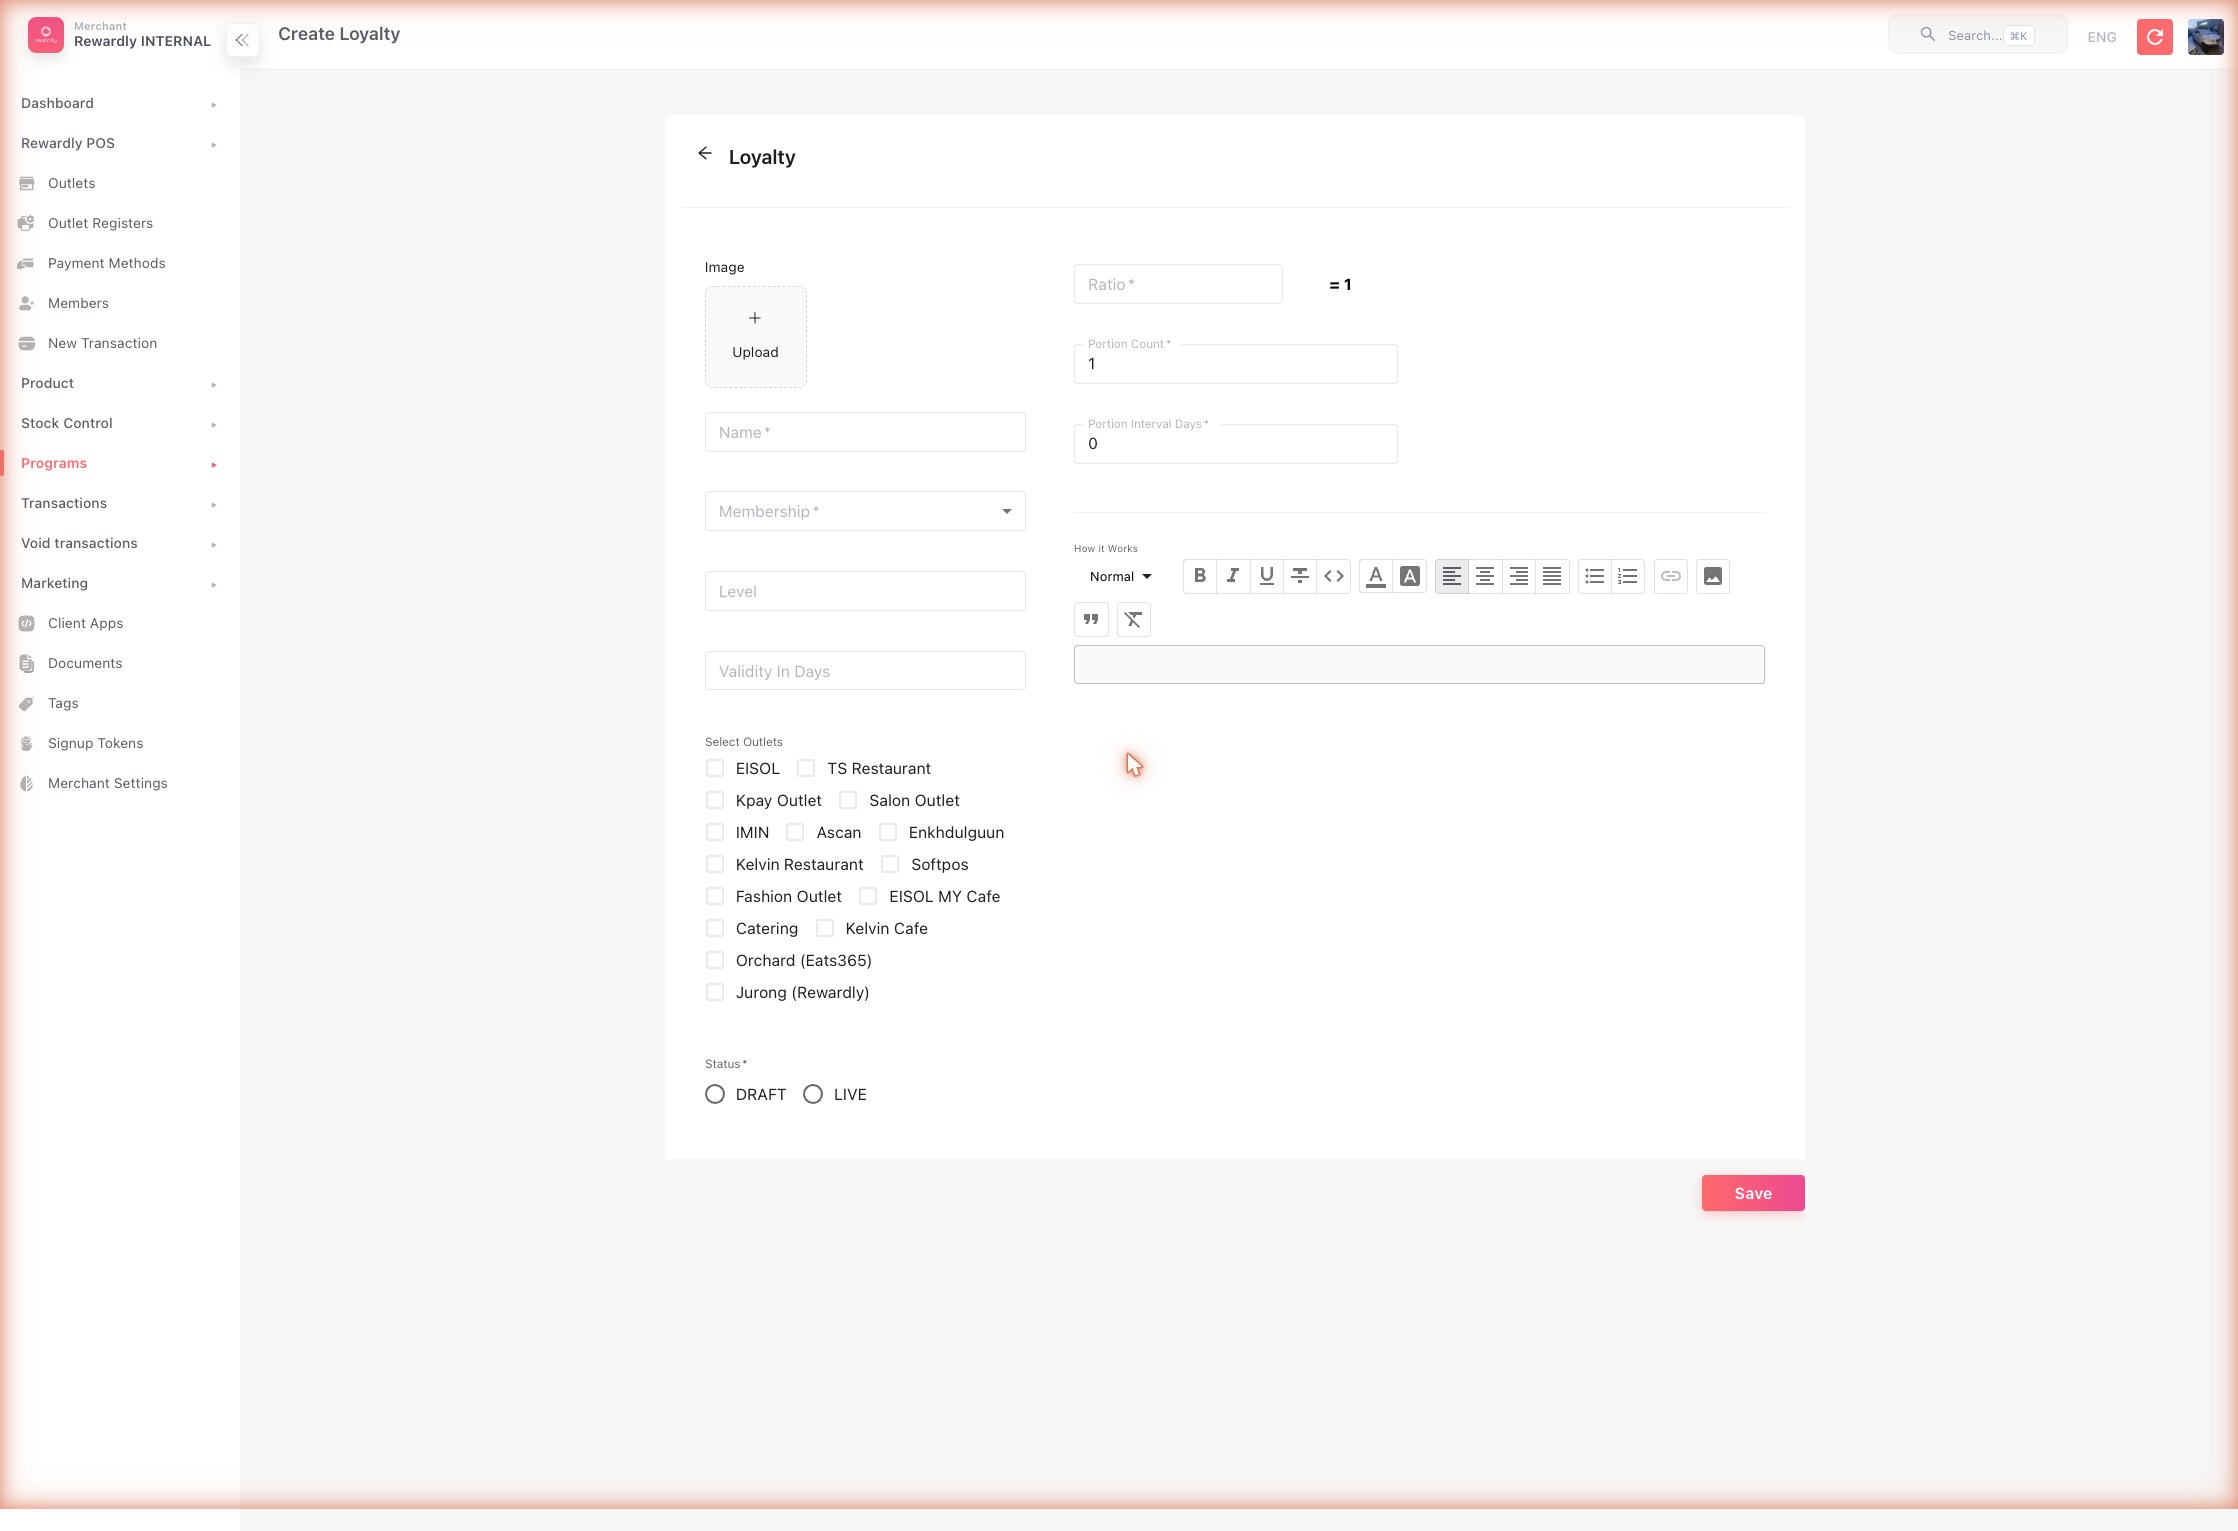
Draft means inactive
A program in Draft earns nothing. It only starts working once Status is Live. Once Live, its fields lock — so finish editing in Draft first.
You now have the Membership + Loyalty pair working. Members earn 1 Bean for every dollar they spend. See Loyalty Points for earning and redeeming in detail.
Step 7 — Connect a POS register
A register is one till inside an outlet. The POS tablet logs in to a register.
- In the sidebar open Outlet Registers, then click Create.
- Enter a Name (
Front Counter), choose your Outlet, and set the Default Order Mode (e.g. Dine in). - Save.
- On the POS tablet app, log in with your merchant account and select this outlet and register.
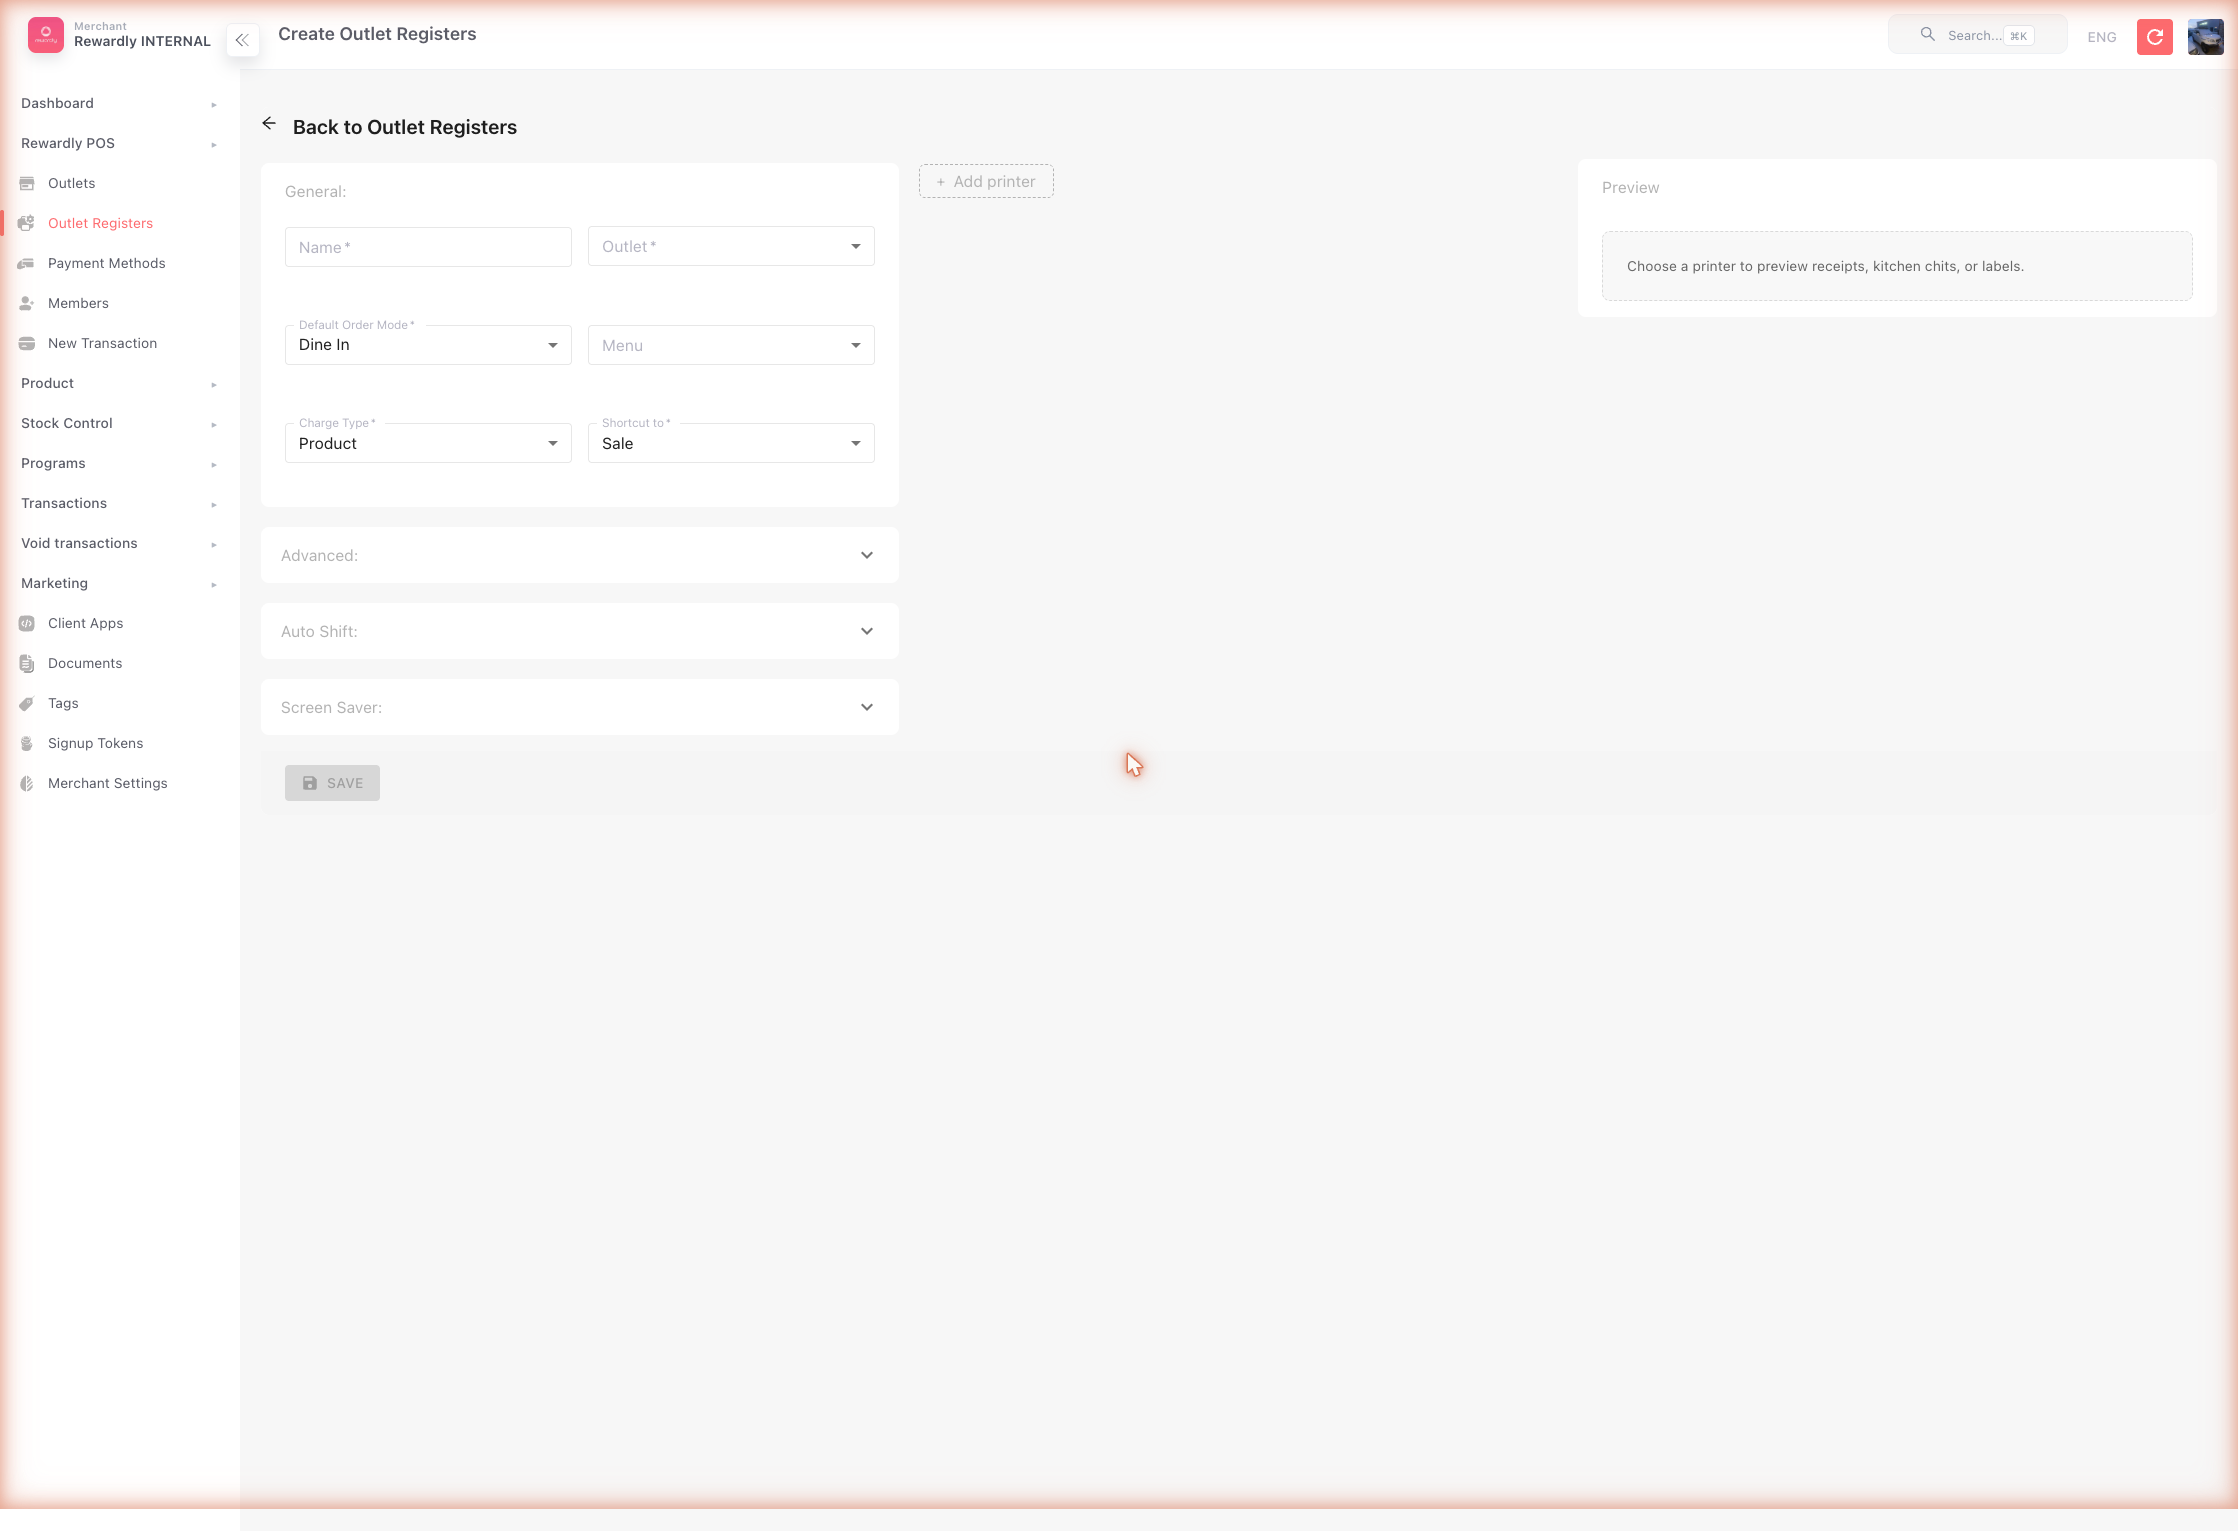 The register's appearance and printing options are covered in POS Settings.
Step 8 — Run a test sale
Now confirm the whole loop works.
- On the POS tablet, start a New Sale and tap a product to add it to the basket.
- Tap the customer button in the basket. Search by phone number, or tap
+ Add … as a new customerto create a test member. - With the member attached, the basket shows their Point balance and Credit.
- Tap Pay, choose Cash, and complete the sale. You'll see "Payment successful!".
- Points are awarded after payment. Open that customer in the member app (or in Loyalty & Programs → History & Transactions in the admin) and confirm their Beans balance went up.
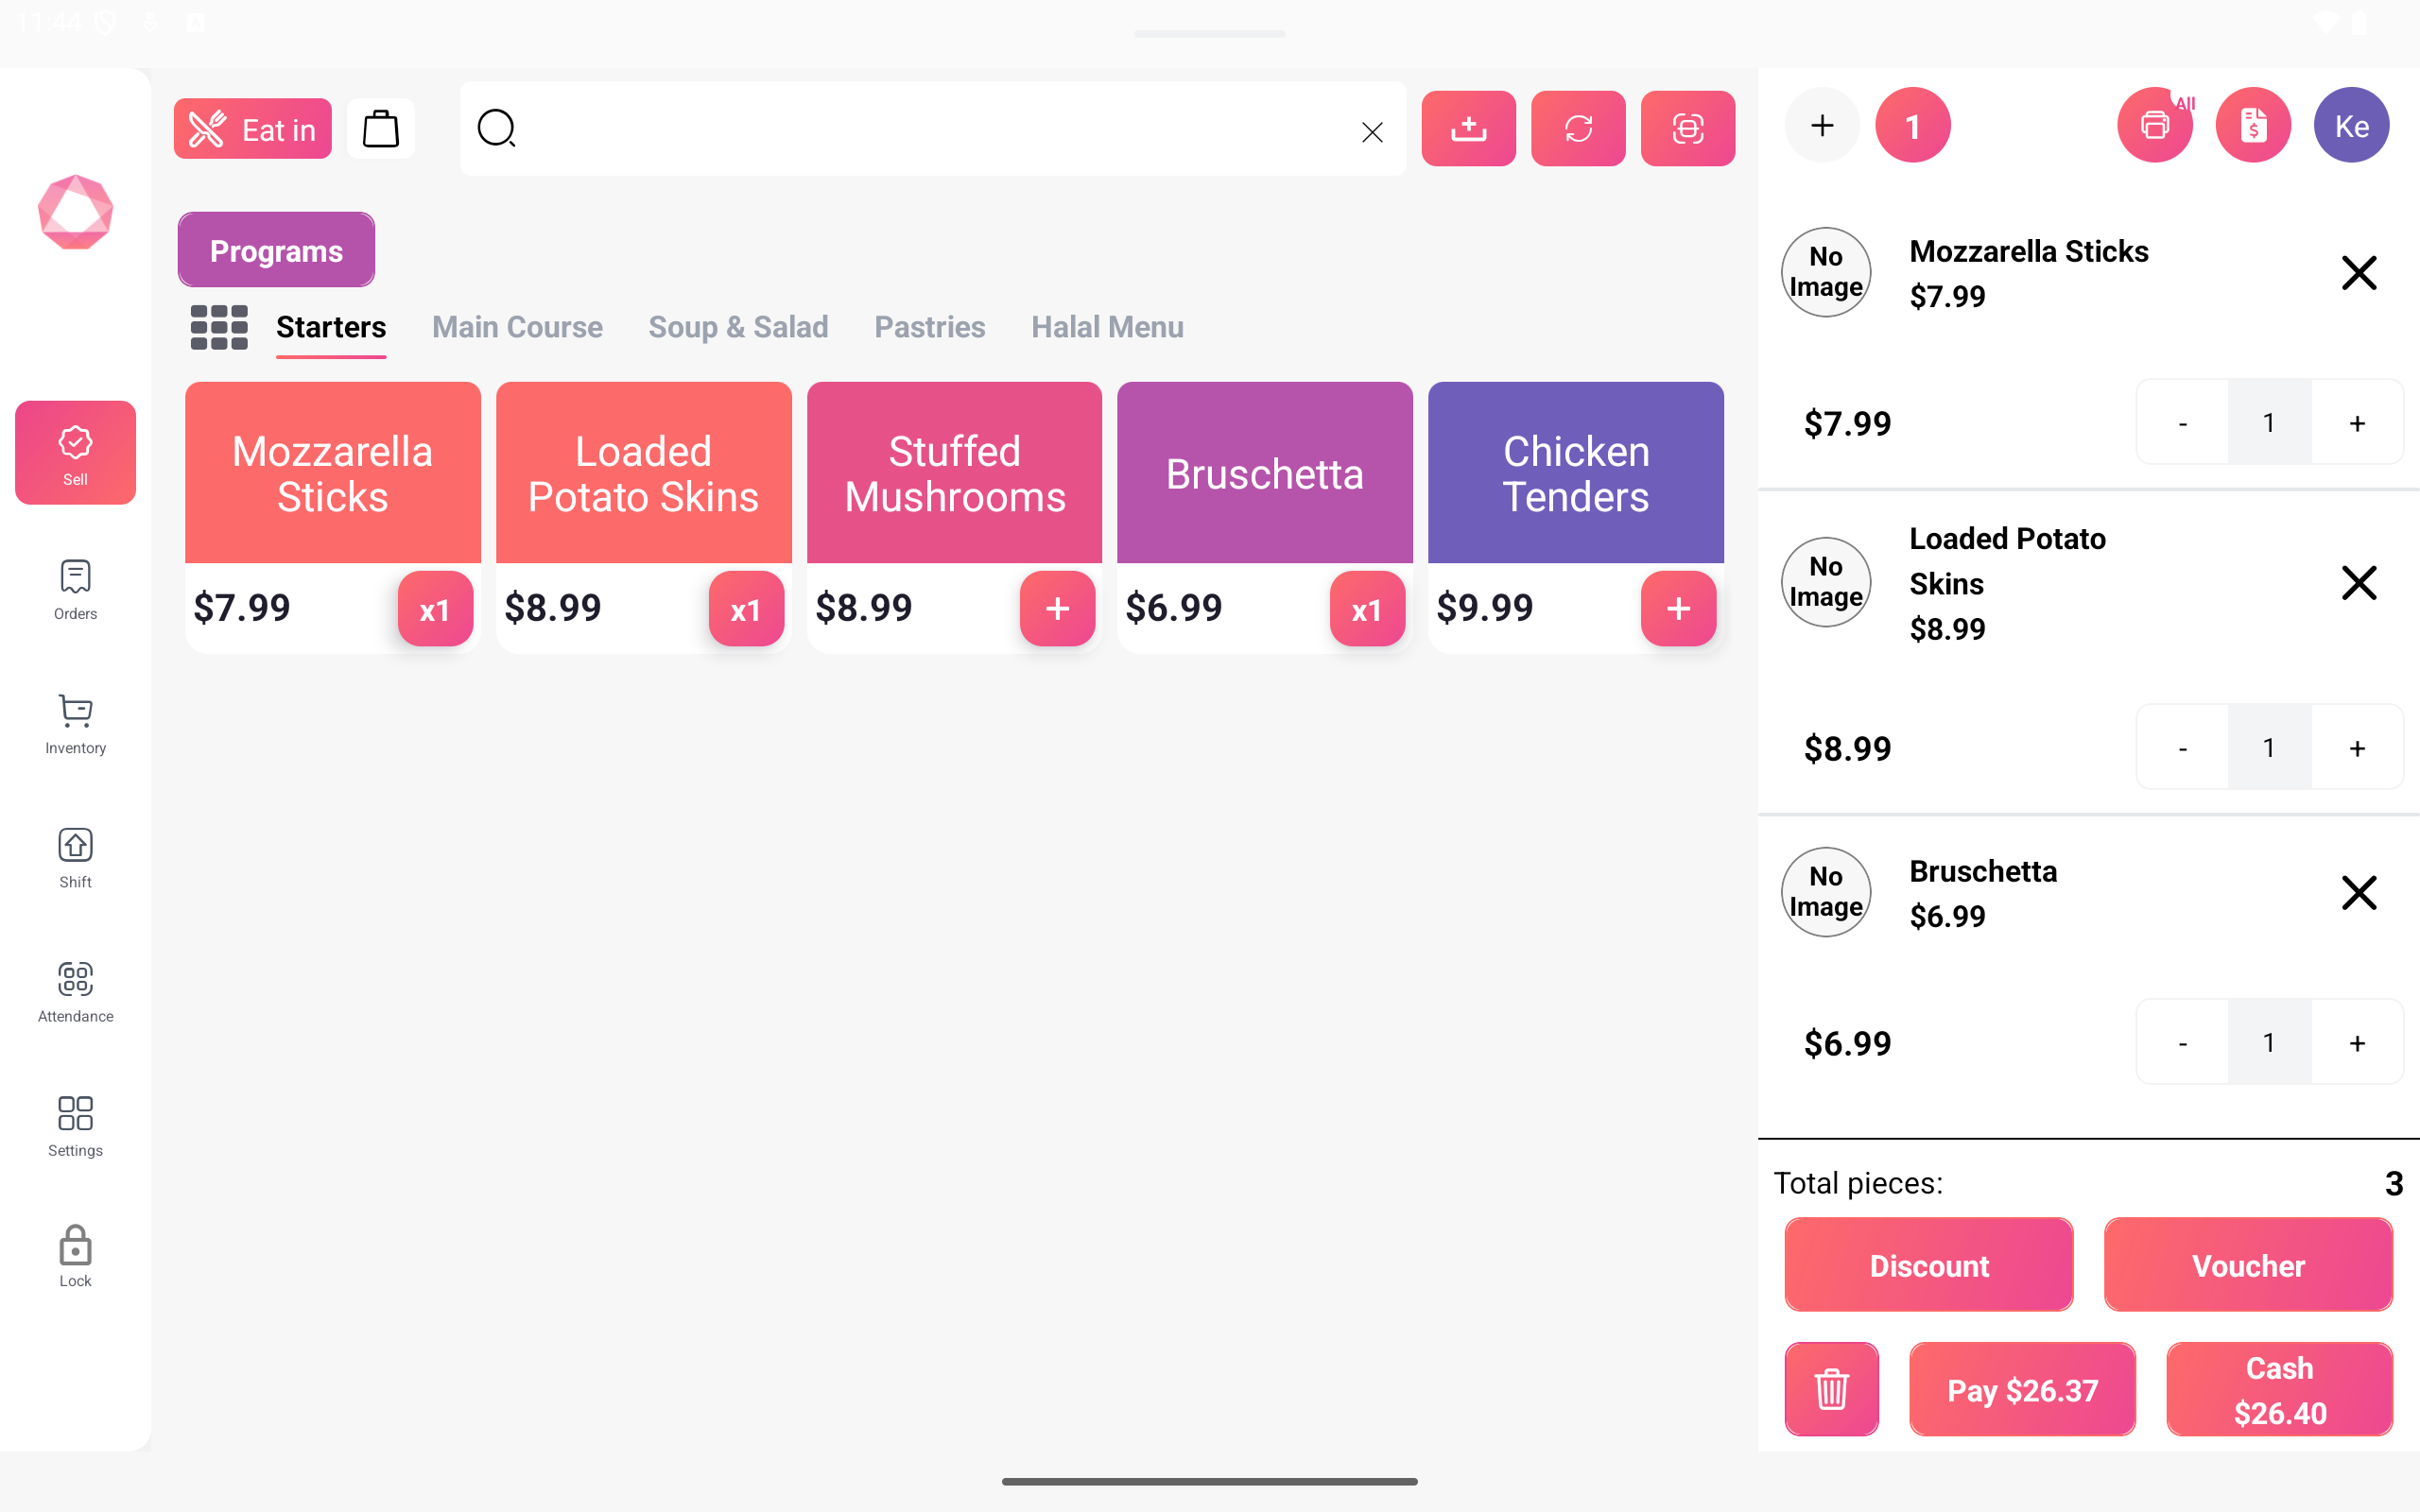
Points appear after payment, not during
The POS never shows "X points earned" on screen. Points are calculated by Rewardly once the payment is complete, and then appear in the member app and your reports.
Step 9 — Go-live checklist
Before you let real customers in, confirm:
- [ ] Merchant Settings → loyalty unit name and point conversion are correct.
- [ ] At least one outlet is created and Active.
- [ ] Your products are created with correct prices.
- [ ] At least one Membership tier exists and is Active.
- [ ] Your Loyalty program is linked to that tier and set to Live (not Draft).
- [ ] Each till has an Outlet Register, and the tablet is logged in to it.
- [ ] A test sale earned points correctly.
- [ ] Payment methods you accept are set up — see Payment Methods.
That's the core. Your loyalty program is live.
Add more LoyaltyOS rewards
Once loyalty is live, add more reward types when you're ready — each has its own guide:
- Membership & Tiers — add Silver / Gold / Platinum levels.
- Vouchers — coupons for money off or free items.
- Stamp Cards — "buy 9, get 1 free" cards.
- Store Credit — a prepaid wallet.
- Discounts and Cashback — instant or returned savings.
- Packages — bundle several rewards into one.
- Referral — reward members for bringing in friends.
Set up the rest of the platform
The steps above get LoyaltyOS live. When you're ready, expand into the other three operating systems — each has its own section in this guide, and every page follows the same Default setup → Advanced options format.
CommerceOS — selling & orders
- [ ] Build a menu of your categories and products.
- [ ] Turn on online ordering and print the QR code.
- [ ] Set up a self-service kiosk, if you use one.
- [ ] Set up kitchen displays for the kitchen or pickup counter.
- [ ] Create tables & sections for dine-in service.
- [ ] Configure delivery and any aggregator platforms.
Start with the CommerceOS overview.
PaymentOS — taking payment
- [ ] Add the payment methods you accept.
- [ ] Ask Rewardly support to connect any card terminals.
- [ ] Add QR / PayNow payments.
- [ ] Decide whether to offer post-pay credit to trusted members.
Start with the PaymentOS overview.
StockOS — inventory
- [ ] Choose your model: Inventory (units) or Ingredients (recipes).
- [ ] Turn on stock tracking and set your starting counts.
- [ ] Add suppliers and raise your first stock order.
Start with the StockOS overview.